11,159 items in this album on 558 pages.
 | 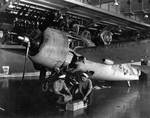 |  |  |
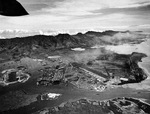
| F4F-3 Wildcat inside USS Enterprise's hangar deck, 28 Oct 1941; note spare TBD and SBD aircraft hanging overhead | F4F-3 Wildcat undergoing maintenance in USS Enterprise's hangar deck, 28 Oct 1941; note spare propellers hanging overhead | Aerial view looking south at Ford Island, Pearl Harbor, US Territory of Hawaii, 30 Oct 1941; note partial view of Battleship Row at left and USS Enterprise at upper left | British Army Lieutenant General Arthur Percival welcoming US envoy Averell Harriman at Sembawang Airfield, Singapore, 30 Oct 1941 |
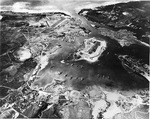 |  |  |  |
| Overhead view of Pearl Harbor Naval Base, Oahu, Hawaii, 30 Oct 1941, 5 weeks before the attack. Photo 1 of 2. | Overhead view of Pearl Harbor Naval Base, Oahu, Hawaii, 30 Oct 1941, 5 weeks before the attack. Photo 2 of 2. | Anti-communist and anti-Semitic posters, Kharkov, Ukraine, Oct-Nov 1941 | BL 15-inch coastal defense gun elevated for firing, Singapore, circa 1941 |
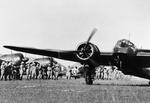 | 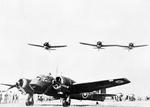 | 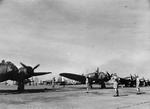 | 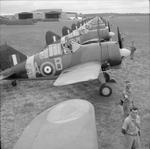 |
| Blenheim Mark I bomber of No. 62 Squadron RAF and Buffalo fighters of Nos. 21 and 453 Squadrons RAAF on the ground, Sembawang, Singapore, late 1941, photo 1 of 2 | Blenheim Mark I bomber of No. 62 Squadron RAF and Buffalo fighters of Nos. 21 and 453 Squadrons RAAF on the ground, Sembawang, Singapore, late 1941, photo 2 of 2 | Blenheim Mark I bombers of No. 62 Squadron RAF and Buffalo fighters of Nos. 21 or 453 Squadrons RAAF at Sembawang, Singapore, late 1941 | Buffalo Mark I fighters of No. 21 Squadron RAAF lining up at Sembawang, Singapore for inspecting by Air Vice Marshal C. W. H. Pulford, Nov 1941 |
 | 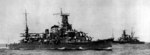 | 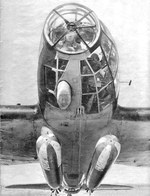 |  |
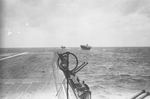
| Buffalo Mark I fighters of No. 453 Squadron RAF at Sembawang, Singapore lined up in preparation of an inspection by Air Vice Marshal C. W. H. Pulford, Nov 1941 | Cruisers Furutaka (foreground) and Kinugasa (background), circa early Nov 1941; note three white stripes on forward funnel and two E7K2 aircraft aboard Furutaka, both of which helped in determining the approximate date of this photograph | He 111-H6 medium bomber armed with two Lufttorpedo LF-5B practice torpedoes, late 1941. Note the asymmetrical design of the nose section. | Japanese carriers Zuikaku (foreground) and Kaga (background) underway toward Hitokappu Bay, Iturup, Kurile Islands, Nov 1941; note Zuikaku's anti-aircraft armament |
 | 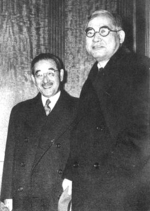 | 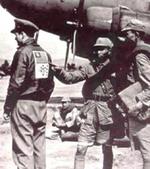 |  |
| Japanese carriers Zuikaku (foreground), Kaga (center), and Akagi (background) underway toward Hitokappu Bay, Iturup, Kurile Islands, Nov 1941; note Zuikaku's anti-aircraft armament | Japanese Special Envoy Saburo Kurusu and Ambassador Admiral Kichisaburo Nomura, Nov 1941 | Nationalist-Chinese soldiers looking at the Blood Chit on the back of an American officer at a Chinese airfield, 1942. Note the C-47 Skytrain. | Paul Hausser in Russia, winter 1941 |
11,159 items in this album on 558 pages.
Search WW2DB
News
- » WW2DB's 20th Anniversary (29 Dec 2024)
- » Wreck of USS Edsall Found (14 Nov 2024)
- » Autumn 2024 Fundraiser (7 Nov 2024)
- » Nobel Peace Prize for the Atomic Bomb Survivors Organization (11 Oct 2024)
- » See all news
Random Photograph
Current Site Statistics
- » 1,150 biographies
- » 337 events
- » 44,024 timeline entries
- » 1,242 ships
- » 350 aircraft models
- » 207 vehicle models
- » 375 weapon models
- » 123 historical documents
- » 260 facilities
- » 470 book reviews
- » 28,627 photos
- » 431 maps
Famous WW2 Quote
"Since peace is now beyond hope, we can but fight to the end."Chiang Kaishek, 31 Jul 1937
Support Us
Please consider supporting us on Patreon. Even $1 a month will go a long way. Thank you!
Or, please support us by purchasing some WW2DB merchandise at TeeSpring, Thank you!