5,940 items in this album on 297 pages.
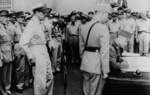 | 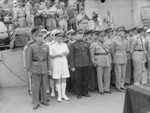 |  |  |
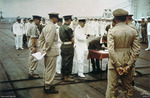
| Xu Yongchang signing the surrender document on behalf of China aboard USS Missouri, Tokyo Bay, Japan, 2 Sep 1945, photo 4 of 5 | Xu Yongchang, Bruce Fraser, Kuzma Derevyanko, Thomas Blamey, L. Moore Cosgrave, and Jacques Le Clerc aboard USS Missouri, Tokyo Bay, Japan, 2 Sep 1945. Note the wire recorder upper left. | General Seishiro Itagaki signing surrender documents aboard HMS Sussex at Singapore, 4 Sep 1945 | US Army Lieutenant General Lucian Truscott of 5th Army saluting guidon of Co. L, 3rd Btn, 442nd RCT, Livorno, Italy, 4 Sep 1945; note Presidential Unit Citation banner on guidon |
 |  |  | 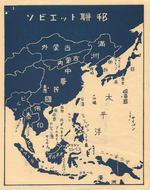 |
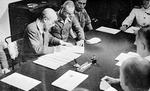
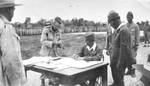
| Lieutenant General Hitoshi Imamura signing the surrender document aboard HMS Glory off Rabaul, New Britain, 6 Sep 1945; Vice Admiral Junichi Kusaka and Lieutenant General Vernon Sturdee were also present | George Patton and Georgy Zhukov, Berlin, Germany, 7 Sep 1945 | Lieutenant General Stilwell accepted Japanese surrender at US Tenth Army Headquarters, Okinawa, 7 Sep 1945. Note Japanese commander Lt General Toshiro Nomi at left in pith helmet. | Leaflets dropped by Royal New Zealand Air Force on Nauru and Ocean Island (now Banaba), 8 Sept 1945. The leaflets urge Japanese soldiers to stop fighting and surrender. Page 1 of 2. |
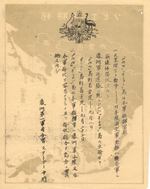 |  |  |  |
| Leaflets dropped by Royal New Zealand Air Force on Nauru and Ocean Island (now Banaba), 8 Sept 1945. The leaflets urge Japanese soldiers to stop fighting and surrender. Page 2 of 2. | Admiral Thomas Kinkaid (with glasses) and Lieutenant General John Hodge signing the Japanese surrender document, General Government Building, Seoul, Korea, 9 Sep 1945 | Australian General Sir Thomas Blamey signing the surrender for Japanese forces throughout the Dutch East Indies, Morotai, 9 Sep 1945. | Australian General Sir Thomas Blamey witnessing Japanese Second Army Lt General Fusataro Teshima signing the instrument of surrender for Japanese forces throughout the Dutch East Indies, Morotai, 9 Sep 1945. Photo 1 of 2 |
 |  |  |  |
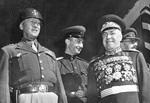
| Australian General Sir Thomas Blamey witnessing Japanese Second Army Lt General Fusataro Teshima signing the instrument of surrender for Japanese forces throughout the Dutch East Indies, Morotai, 9 Sep 1945. Photo 2 of 2 | Chinese General He Yingqin signing the Japanese surrender document at the Chinese Military Academy in Nanjing, China, 9 Sep 1945, photo 1 of 2 | Chinese General He Yingqin signing the Japanese surrender document at the Chinese Military Academy in Nanjing, China, 9 Sep 1945, photo 2 of 2 | General First Class He Yingqin, General Second Class Gu Zhutong, and Lieutenant General Xiao Yisu inspecting the Japanese instrument of surrender, Nanjing, China, 9 Sep 1945 |
 | 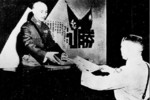 | 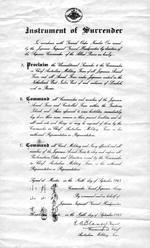 |  |
| He Yingqin inspecting the Japanese surrender document at the Chinese Military Academy in Nanjing, China, 9 Sep 1945; note US representative General Megrow and General Gu Zuodong | He Yingqin presenting the signed instrument of surrender to Chiang Kaishek, Nanjing, China, 9 Sep 1945 | Instrument of Surrender for the Japanese Second Army signed by Lt General Fusataro Teshima for the Japanese and General Sir Thomas Blamey for the Australian Military Forces, 9 Sep 1945 at Morotai. | Japanese China Expeditionary Army Chief of Staff Asasaburo Kobayashi surrendering to He Yingqin, Nanjing, China, 9 Sep 1945, photo 1 of 3 |
5,940 items in this album on 297 pages.
Search WW2DB
News
- » WW2DB's 20th Anniversary (29 Dec 2024)
- » Wreck of USS Edsall Found (14 Nov 2024)
- » Autumn 2024 Fundraiser (7 Nov 2024)
- » Nobel Peace Prize for the Atomic Bomb Survivors Organization (11 Oct 2024)
- » See all news
Random Photograph
Current Site Statistics
- » 1,150 biographies
- » 337 events
- » 44,164 timeline entries
- » 1,243 ships
- » 350 aircraft models
- » 207 vehicle models
- » 375 weapon models
- » 123 historical documents
- » 260 facilities
- » 470 book reviews
- » 28,650 photos
- » 431 maps
Famous WW2 Quote
"The raising of that flag on Suribachi means a Marine Corps for the next 500 years."James Forrestal, Secretary of the Navy, 23 Feb 1945
Support Us
Please consider supporting us on Patreon. Even $1 a month will go a long way. Thank you!
Or, please support us by purchasing some WW2DB merchandise at TeeSpring, Thank you!