 |  | 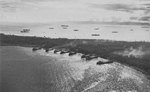 |  |
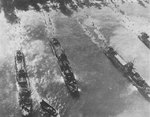
| US Navy LCI(L) ships unloading men of US Army at a beach in southwestern Morotai, Dutch East Indies, 15 Sep 1944 | American transports unloading supplies at Morotai, Sep 1944, photo 1 of 2 | American transports unloading supplies at Morotai, Sep 1944, photo 2 of 2 | Australian General Sir Thomas Blamey signing the surrender for Japanese forces throughout the Dutch East Indies, Morotai, 9 Sep 1945. |
 | 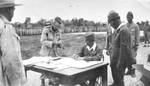 | 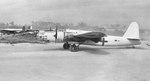 | |
| Australian General Sir Thomas Blamey witnessing Japanese Second Army Lt General Fusataro Teshima signing the instrument of surrender for Japanese forces throughout the Dutch East Indies, Morotai, 9 Sep 1945. Photo 1 of 2 | Australian General Sir Thomas Blamey witnessing Japanese Second Army Lt General Fusataro Teshima signing the instrument of surrender for Japanese forces throughout the Dutch East Indies, Morotai, 9 Sep 1945. Photo 2 of 2 | Japanese Nakajima Ki-49 ‘Helen’ bomber at Pitoe, Morotai with staff of Japanese Lt General Fusataro Teshima from Pinrang, Celebes (now Sulawesi) to surrender the Japanese Second Army to General Thomas Blamey, 9 Sep 1945 |
Search WW2DB

News
- » Wreck of Teruzuki Found (27 Jul 2025)
- » USS Orlean's Bow Found (22 Jul 2025)
- » The Emperor of Japan Planned to Honor WW2-era Japanese POWs in Mongolia (4 Jul 2025)
- » US State Lawmaker John Winter Caught Using Racial Slur "Jap" and Apologized (11 Jun 2025)
- » US Government Plans to Purge WW2 Information (17 Mar 2025)
- » See all news
Random Photograph
Current Site Statistics
- » 1,182 biographies
- » 337 events
- » 45,119 timeline entries
- » 1,248 ships
- » 350 aircraft models
- » 207 vehicle models
- » 376 weapon models
- » 123 historical documents
- » 261 facilities
- » 470 book reviews
- » 28,411 photos
- » 365 maps
Famous WW2 Quote
"I have returned. By the grace of Almighty God, our forces stand again on Philippine soil."General Douglas MacArthur at Leyte, 17 Oct 1944
Support Us
Please consider supporting us on Patreon. Even $1 a month will go a long way. Thank you!
Or, please support us by purchasing some WW2DB merchandise at TeeSpring, Thank you!