Raids into the Indian Ocean
Contributor: C. Peter Chen
ww2dbaseIn early 1942, the British were attempting to re-establish a naval presence in Asia after the destruction of Z Force off Kuantan, British Malaysia at the opening of the Pacific War. Ceylon was chosen as the new main navy base, with an additional naval base established at Addus Atoll in the Maldive Islands 600 miles southwest of Ceylon. Admiral James Somerville was assigned to lead the new British Eastern Fleet. The carriers Indomitable, Formidable, and Hermes were assigned to the fleet, capable to launching over 90 planes, though most of the planes were of older models inferior to the Japanese Zero fighters. In terms of surface fighting ships, the British Eastern Fleet boasted five WW1-era battleships, two heavy cruisers, five light cruisers, sixteen destroyers, seven submarines, and various support craft. The British primary objective for securing the Indian Ocean was to aid the ground war in Burma and to safeguard Allied shipping carrying Ceylon rubber, Middle Eastern oil, troops, and war equipment.
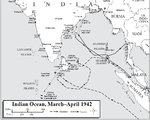
ww2dbaseHaving effectively put an end to Allied naval strength in the South Pacific with the annihilation of the ABDA forces around Java, Dutch East Indies, the Japanese naval leadership made a plan to sail westward into the Indian Ocean to attack the new British naval concentration at Ceylon (the Japanese had not yet detected the activities at Addus) before it became a serious threat to operations in Burma and in the South Pacific. The Japanese fleet departed from Celebes in Dutch East Indies on 26 Mar 1942; the fleet was built around the carriers Akagi, Ryujo, Hiryu, Soryu, Shokaku, and Zuikaku.
ww2dbaseThe Americans had intercepted Japanese communications leading up to the raid and had given Somerville warning, who ordered the bulk of the fleet to set sail for Addus Atoll.
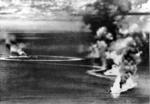
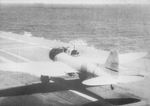
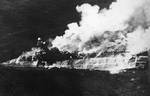
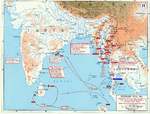
ww2dbaseOn 31 Mar, the task force under Admiral Jisaburo Ozawa centered around carrier Ryujo struck first, sinking 23 British ships in the Bay of Bengal. On the morning of 5 Apr, Admiral Chuichi Nagumo launched his carrier aircraft (91 bombers and 36 fighters) against Colombo, Ceylon; the Japanese shot down 19 of the 42 RAF fighters that scrambled at the loss of 7. British destroyer Tenedos and armed merchant cruiser Hector were lost at Colombo. En route back to their carriers, 50 of the aircraft that had struck Colombo came upon British heavy cruisers Dorsetshire and Cornwall and sank them, killing 424. On 9 Apr, Nagumo launched an attack at Trincomalee, on the eastern side of Ceylon; the Japanese shot down 5 of the 27 aircraft that scrambled and sank one merchant ship. On the return trip, luck again struck the carrier aircraft as they came across British light carrier Hermes, Australian destroyer HMAS Vampire, British corvette Hollyhock, and two tankers, devastating them; Hermes, which sank after receiving 40 hits, suffered 307 killed alone. In the two devastating attacks at and near Ceylon, Nagumo had only lost 18 aircraft.
ww2dbaseThe British Eastern Fleet would fall back to East Africa to safeguard the remaining naval assets from further destruction at the hands of the Japanese Navy.
ww2dbaseEpilogue: Continuing Pressure in the Indian Ocean
ww2dbaseIn late Mar 1942, the German naval staff had requested the Japanese Navy to raid Allied shipping in the Indian Ocean, and by the first week of Apr several Japanese submarines were operating as far west as waters south of South Africa. Japanese operations in the Indian Ocean disrupted the important Allied shipping route along the eastern coast of the African continent and caused some concerns when the Allies invaded Madagascar. By Jun, Japanese submarines in the region were focusing on the Mozambique Channel between continental Africa and Madagascar, sinking 120,000 tons worth of shipping by mid-Jul 1942. Although this Japanese foray into the Indian Ocean was fruitful, the main focus of the war for Japan was the South Pacific, thus when the submarines were withdrawn for replenishment in the fall of 1942, they never returned in significant strength.
ww2dbaseSources:
Dan van der Vat, The Pacific War
Nihon Kaigun
Wikipedia
Last Major Update: Jul 2005
Raids into the Indian Ocean Interactive Map
Photographs
 |  |  |  |
Maps
 |  |
Raids into the Indian Ocean Timeline
| 9 Mar 1942 | Admiral Isoroku Yamamoto issued orders to the fleet to prepare for Operation C, a raid into the Indian Ocean. |
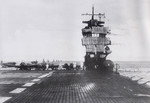
| 26 Mar 1942 | Vice Admiral Chuichi Nagumo's Japanese First Air Fleet, built around a nucleus of five aircraft carriers, sailed from Staring Bay, Celebes, Dutch East Indies to the west of Timor into the Indian Ocean with the intention of attacking the Royal Navy's bases at Colombo and Trincomalee in Ceylon. |
| 26 Mar 1942 | Vice Admiral Chuichi Nagumo's Japanese First Air Fleet, built around a nucleus of five aircraft carriers (Akagi, Hiryu, Soryu, Shokaku, and Zuikaku), and supported by battleships (Kongo, Hiei, Haruna, and Kirishima), cruisers (Tone, Chikuma, Abukuma), and destroyers, sailed from Staring Bay, Celebes, Dutch East Indies to the west of Timor into the Indian Ocean with the intention of attacking the Royal Navy's bases at Colombo and Trincomalee in Ceylon. |
| 27 Mar 1942 | The German naval staff requested the Japanese to conduct raids against Allied shipping in the Indian Ocean. |
| 28 Mar 1942 | A second Japanese carrier fleet set sail for the Indian Ocean. |
| 1 Apr 1942 | Vice Admiral Jisaburo Ozawa's Malaya Force, Second Expeditionary Fleet, departs Mergui, Burma and steams into the Bay of Bengal in the Indian Ocean Raids to attack merchant shipping. The force includes light carrier Ryujo and cruisers Chokai, Suzuya, Kumano, Mikuma, Mogami, and Yura. |
| 3 Apr 1942 | The Japanese fleet under the command of Vice Admiral Chuichi Nagumo entered the Indian Ocean. |
| 4 Apr 1942 | As Japanese carriers sailed toward Ceylon, the fleet was discovered by a Canadian PBY Catalina aircraft 400 miles south of the island. A Zero fighter from carrier Hiryu shot down the Catalina aircraft (3 killed, several captured) but not until they radioed in the fleet's location. |
| 5 Apr 1942 | In the morning, Japanese carriers launched 36 D3A2 dive bombers and 53 B5N2 torpedo bombers, escorted by 36 Zero fighters, against the British naval base at Colombo, Ceylon, sinking merchant cruiser HMS Hector, damaging port facilities, while shooting down 25 British aircraft; 7 Japanese aircraft were lost in this attack. Around noon, cruiser Tone's floatplane spotted British cruisers HMS Cornwall and HMS Dorsetshire 200 miles southwest of Ceylon; 53 carrier aircraft were launched to attack, sinking Dorsetshire at 1350 hours (234 killed) and Cornwall at 1400 hours (190 killed); 1,122 survived from both ships. |
| 5 Apr 1942 | Following Admiral Jisaburo Ozawa’s force’s attack on the British naval base at Colombo, Ceylon, the force is split creating a Northern Group commanded by Rear Admiral Takeo Kurita consisting of cruisers Kumano and Suzuya; the Center Group consisting of the carrier Ryujo and cruisers Chokai and Yura under Ozawa; and the Southern Group comprised of cruisers Mogami, and Mikuma under Captain Shakao Sakiyama for the purposes of smaller raids against merchant shipping. |
| 6 Apr 1942 | Kurita's Northern Group attacked and sank seven merchant ships totaling 41,000 tons along India's northeastern coast south of Calcutta (Kolkata). |
| 6 Apr 1942 | Sakiyama's Southern Group of Mogami, Mikuma and destroyer Amagiri sank four merchantmen totaling 19,000 tons with two of them finished off with torpedoes from Amagiri. |
| 6 Apr 1942 | Japanese warships sank 13 freighters southeast of India, while carrier aircraft from Ryujo conducted raids against ports Vizagapatam and Cocanada on the eastern coast of India, sinking 3 ships. |
| 8 Apr 1942 | A Catalina flying boat spotted a Japanese carrier fleet approaching Trincomalee, Ceylon. On this news, British aircraft carrier HMS Hermes and Australian destroyer HMAS Vampire departed Trincomalee in an attempt to escape the impending attack. |
| 9 Apr 1942 | Japanese carrier aircraft attacked the harbor at Trincomalee, Ceylon at 0700 hours. Two hours later, empty British aircraft carrier HMS Hermes and Australian destroyer HMAS Vampire were detected 90 miles further south. At 1035 hours, Japanese carrier aircraft attacked and sank HMS Hermes (307 killed) and HMAS Vampire (9 killed); hospital ship Vita rescued survivors from both warships. At 1207 hours, 20 Japanese carrier dive bombers sank British oiler Athelstane (all aboard survived) and British corvette HMS Hollyhock (48 were killed, 17 survived) in the Indian Ocean. |
| 11 Apr 1942 | Ozawa's Force arrived at Singapore to conclude a successful sortie into the Indian Ocean. |
| 12 Apr 1942 | Japanese carrier fleet began to depart from the Indian Ocean after a successful raid. |
| 7 May 1942 | The floatplane of Japanese submarine I-30 conducted a reconnaissance mission over the port of Aden, a British Crown Colony. |
| 5 Jun 1942 | Japanese merchant raiders Aikoku Maru and Hokoku Maru sank British passenger liner Elysia 350 miles off Durban, South Africa. To the north on the same day, off Portuguese Overseas Province of Mozambique, Japanese submarine I-10 sank Panamanian ship Atlantic Gulf at 0231 hours, I-10 sank US freighter Melvin H Baker at 1044 hours, and I-20 sank Panamanian ship Johnstown. |
| 6 Jun 1942 | Japanese submarine I-16 sank Yugoslavian freighter Susak with her deck gun just off the coast of Portuguese Overseas Province of Mozambique. |
| 8 Jun 1942 | Japanese submarine I-10 sank British ship King Lud in the Mozambique Channel at 0953 hours with torpedoes, killing all aboard. In the same area, I-16 sank Greek ship Aghios Georgios IV with her deck gun and I-18 sank Norwegian ship Wilford with her deck gun. In the middle of the Indian Ocean, I-20 sank Greek ship Christos Markettos. |
| 12 Jun 1942 | Japanese submarine I-16 sank Yugoslavian ship Supetar in the Mozambique Channel. In the same area, I-20 sank Panamanian ship Hellenic Trader and British ship Clifton Hall. |
| 28 Jun 1942 | Japanese submarine I-10 sank British merchant ship Queen Victoria in the Mozambique Channel. |
| 30 Jun 1942 | Japanese submarine I-10 sank US ship Express in the Mozambique Channel, killing 13. In the same area, I-20 sank British tanker Steaua Romana. |
| 1 Jul 1942 | Japanese submarine I-16 sank Swedish ship Eknaren in the Mozambique Channel. In the same area, I-18 sank Dutch ship De Weert. |
| 6 Jul 1942 | Japanese submarine I-10 sank Greek merchant ship Nymphe in the Mozambique Channel at 1615 hours. |
| 8 Jul 1942 | Japanese submarine I-10 sank British ship Hartismere in the Mozambique Channel at 0748 hours; all aboard survived. I-10 struck again at 1800 hours, sinking Dutch freighter Alchiba in the same area, killing 5. |
| 12 Jul 1942 | Japanese armed merchant cruisers Aikoku Maru and Hokoku Maru sank New Zealand freighter Hauraki in the Mozambique Channel. |
| 17 Jul 1942 | German submarine U-178 sank transport City of Canton northeast of Beira, Mozambique at 0031 hours; 8 were killed, 76 survived (one of whom was taken prisoner by the Germans). |
| 20 Jul 1942 | German armed merchant cruiser Thor sank British ship Indus 1,950 miles west of Australia; 22 were killed, 49 survived. |
| 25 Aug 1942 | Japanese submarine I-165 sank British ship Harmonides 250 miles south of Ceylon; 14 were killed. |
| 2 Sep 1942 | Japanese submarine I-29 sank British ship Gazcon in the mouth of the Gulf of Aden; killing 12. |
| 10 Sep 1942 | Japanese submarine I-29 sank British cargo ship Haresfield at the mouth of the Gulf of Aden, killing 12. |
| 11 Sep 1942 | German armed merchant cruiser Michel attacked British merchant ship Empire Dawn in the Indian Ocean. Empire Dawn attempted to signal that the crew would abandon ship, but Michel continued to shell the British ship. 22 of Empire Dawn's crew were killed during the sinking; 22 survived and were captured by Michel. |
| 16 Sep 1942 | Japanese submarine I-29 sank British ship Ocean Honour in the mouth of the Gulf of Aden; 20 were killed, 33 survived. |
| 22 Sep 1942 | Japanese submarine I-29 sank US freighter Paul Luckenbach 800 miles west of Kochi, India. |
| 24 Sep 1942 | Japanese submarine I-165 sank US freighter Losmar 220 miles west of the southern tip of India; 3 were killed, 14 survived. |
| 17 Apr 1943 | Leonardo da Vinci sank Dutch freighter Sembilan, en route from Glasgow, United Kingdom to Durban, South Africa with ammunition aboard, in the Indian Ocean at 1130 hours. Of the 86 aboard, only the Indian sailor Shamshen survived. Leonardo da Vinci picked up Shamshen, who had suffered a broken leg. |
| 18 Apr 1943 | Leonardo da Vinci sighted the 8,007-ton British freighter Manaar in the Indian Ocean at 0315 hours and hit her in the No. 1 Hold on the starboard side with a torpedo. The crew abandoned ship, but the ship did not sink. At 0430 hours, another hit was made in the No. 4 Hold on the port side. Still afloat, the Italian submarine fired 23 100-millimeter rounds from her deck gun between 0545 and 0710 hours, scoring 12 hits and finally sinking her. Four crew members were killed during the sinking, one officer was picked up by Leonardo da Vinci as a prisoner, and 93 survived. Leonardo da Vinci approached one of the lifeboats and disembarked Indian sailor Shamshen, who was the lone survivor from Dutch freighter Sembilan which was sunk by Leonardo da Vinci on the previous date. |
| 21 Apr 1943 | Leonardo da Vinci sank American freighter John Drayton, en route from Bahrain to Cape Town, South Africa, with one torpedo hit (out of four fired) and gunfire in the Indian Ocean at 1815 hours. All 56 aboard survived the sinking, but only 30 would survive the subsequent journeys aboard lifeboats. |
| 25 Apr 1943 | Leonardo da Vinci hit British tanker Doryssa, en route from Cape Town, South Africa to Abadan, Iran, with a torpedo in the Indian Ocean at 1726 hours. At 1845 hours, a second torpedo hit her. Shortly after, Leonardo da Vinci closed in and sank the tanker with gunfire. 53 were killed, and the 11 survivors were picked up by British whaler HMSAS Southern Barrier five days later. Having expended all torpedoes, the Italian submarine began her journey back to Bordeaux, France. |
Please consider supporting us on Patreon. Even $1 per month will go a long way! Thank you. Please help us spread the word: Stay updated with WW2DB: |
Visitor Submitted Comments
26 Dec 2020 06:18:16 PM
Great information.
6 Apr 2021 10:24:36 PM
how could shokaku be in this battle? consider the distance from ceylon longitude 80 to coral sea where shokaku fought lexington may 7. not enuf time at 30 knots to be at each location. please correct name.
6 Apr 2021 10:53:57 PM
Hiro (above):
Shokaku launched airstrikes against Ceylon (Sri Lanka) on 9 Apr 1942 as part of this raid. She then sailed directly east and transited the Luzon Strait on 18 Apr 1942. She arrived at Truk on 25 Apr 1942 where she spent 5 days. Departing Truk on 1 May 1942, she arrived 300 miles SW of Tulagi on 7 May 1942 where the Battle of the Coral Sea was joined. Average cruising speed (rate of advance): 13 knots. See http://www.combinedfleet.com/shokaku.htm
All visitor submitted comments are opinions of those making the submissions and do not reflect views of WW2DB.
» Fuchida, Mitsuo
» Harada, Kaname
» Kaneko, Tadashi
» Kondo, Nobutake
» Minami, Yoshimi
» Nagumo, Chuichi
» Ohara, Hisashi
» Ozawa, Jisaburo
» Somerville, James
» Tokuno, Hiroshi
» Yanagimoto, Ryusaku
Locations:
» Ceylon
» Indian Ocean
Ship Participants:
» Akagi
» Chikuma
» Cornwall
» Dorsetshire
» Haruna
» Hermes
» Hiryu
» Kirishima
» Kumano
» Mikuma
» Mogami
» Shokaku
» Soryu
» Suzuya
» Tanikaze
» Tone
» Vampire
» Zuikaku
- » 1,169 biographies
- » 337 events
- » 44,828 timeline entries
- » 1,244 ships
- » 350 aircraft models
- » 207 vehicle models
- » 376 weapon models
- » 123 historical documents
- » 261 facilities
- » 470 book reviews
- » 28,520 photos
- » 365 maps
General Douglas MacArthur at Leyte, 17 Oct 1944
Please consider supporting us on Patreon. Even $1 a month will go a long way. Thank you!
Or, please support us by purchasing some WW2DB merchandise at TeeSpring, Thank you!
24 Aug 2014 12:02:13 AM
this is very good information