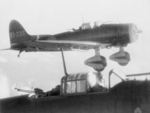
![Solomons Campaign file photo [542]](/images/battle_solomons1.jpg "Solomons Campaign file photo [542]")
Solomon Islands Campaign
Contributor: C. Peter Chen
ww2dbaseThis article does not include events taking place on and around the island of Guadalcanal. For details on the Guadalcanal Campaign, please see the Guadalcanal Campaign article.
ww2dbaseAlso, this article does not include events taking place on and around New Britain and New Ireland, either. As they were administratively parts of Australian New Guinea, please see the three New Guinea campaign articles (Jan 1942, 1942-1943, 1943-1945).
ww2dbaseBattle of Eastern Solomons
23-25 Aug 1942
ww2dbaseThe first major carrier battle off the Solomon Islands occurred shortly after the American landings on Guadalcanal. Although Guadalcanal was always a secondary objective for the Japanese, they realized regular reinforcements and supply runs were critical for a continuous campaign on that island to recapture Henderson Field. Consequently, Admiral Isoroku Yamamoto put together a powerful expeditionary force whose aim was first to destroy any American fleet units that might be in the area, and then eliminate Henderson Field. This force sortied from Truk on 23 Aug. Simultaneously, several other reinforcement, support, and bombardment groups sortied from both Truk and Rabaul.
ww2dbaseThe Americans had a maximum of three carriers with which to meet the Japanese force, but Wasp was detached to refuel on 23 Aug, so she was out of the coming action. As a result, the Americans only had two carriers, Saratoga and Enterprise, and their 176 aircraft to meet the two Japanese fleet carriers Shokaku and Zuikaku and the light carrier Ryujo. The Japanese had 177 aircraft at their disposal. In his usual tendency to devise complex battle plans, Yamamoto sent the light carrier Ryujo ahead of the rest of the fleet on a bait role, sending her planes to attack Guadalcanal, thus drawing attention from the American pilots; meanwhile, the aircraft from the two fleet carriers would charge in to attack the American counterparts. The bait Ryujo was overwhelmed and was hit by several 1,000-lb bombs then subsequently one hit by aerial torpedo. She eventually sank that night after being abandoned. While Ryujo was being attacked, her larger fleet mates Shokaku and Zuikaku counterattacked. Their aircraft passed the curtain of anti-aircraft fire laid down by North Carolina and other ships, and damaged Enterprise badly with three bomb hits. The bombs passed through several decks aft and exploded deep in the carrier and caused serious fires and casualties. However, effective damage control kept her from being disabled. She was able to restore use of the flight deck briefly while Nagumo's aircraft returned for fuel. Enterprise managed to transfer the majority of her aircraft to Henderson Field before limping away to the southeast to fight another day. During this confrontation, Enterprise's aircraft also disabled the Japanese seaplane carrier Chitose, though she would be saved. The Japanese fleet attempted to Admiral Nobutake Kondo looked to engage the Americans in a night surface fight with his battleships and cruisers, but Fletcher withdrew southward to avoid just such an engagement. After failing to find the American fleet, Kondo turned his force back at 2330, ending the battle.
ww2dbaseThe next day both fleets "groped for each other like tired wrestlers with smoke in their eyes", said Dan van der Vat. The Japanese launched an air raid on Guadalcanal, causing havoc, while American Marine aircraft engaged Tanaka's convoy headed by the flagship Jintsu near Taivu Point. A Japanese transport was sunk, and the older destroyer Mutsuki was so badly hit that she had to be scuttled. Several other warships were damaged; Tanaka's own Jintsu was hit as well. At this point, Tanaka wisely withdrew and rescheduled the supply run for the night of 28 Aug via destroyers. Meanwhile, the American carrier Wasp positioned herself east of Guadalcanal expecting Japanese movement there, but found none.
ww2dbaseStrategically, the Japanese had an opportunity for a decisive victory but failed to achieve it, instead allowing the Americans to step away with a perception of victory, even only with a small margin. Additionally, the reinforcement of Henderson Field of Guadalcanal by Enterprise's aircraft became a precedent, making daylight supply runs to Guadalcanal impossible for Japanese shipping. The Japanese only weeks before had total control of the sea in the region; now they were forced to making supply runs only under the cover of darkness.
ww2dbaseBattle of the Santa Cruz Islands
25-27 Oct 1942
ww2dbaseSince Battle of Eastern Solomons, Yamamoto's standing order for the navy had always been "to apprehend and annihilate any powerful forces in the Solomons area, as well as any reinforcements." He was sure his Combined Fleet could do just that with an arsenal of 4 carriers, 5 battleships, 14 cruisers, and 44 destroyers; the force greatly outnumbered anything William Halsey, who entered the theater on 15 Oct, had under his disposal.
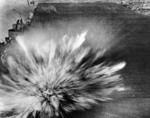
ww2dbaseOn 23 Oct 1942, 650 miles north of Espiritu Santo, an American aircraft spotted a Japanese carrier and radioed in the warning. A small group of torpedo bombers took off to search for the ship, and only one pilot was able to find the ship; he launched his torpedo but it missed. On 26 Oct, the scouting aircraft of the two opposing carrier groups found each other. Vice Admiral Nobutake Kondo launched his 65 aircraft first, then Rear Admiral Thomas Kinkaid launched his aircraft from Enterprise 20 minutes later. Rear Admiral George Murray did not launch his aircraft from carrier Hornet until yet another 30 minutes later. The Americans launched in total 73 aircraft. The Japanese found the American carriers first, but with Enterprise hiding in a squall, Hornet was the only one the Japanese pilots saw, and that was how they reported it back to Kondo. Hornet began to be attacked around 0910 by the entire Japanese force, but Hornet and her anti-aircraft screen laid out a heavy wall of flak. Within minutes of engagement, a bomb hit the starboard side of the flight deck aft, then two near-misses caused minor damage. Next, the Japanese squadron commander crashed his damaged dive bomber into Hornet, glancing off the stack and the two still-attached bombs exploded. Finally, two aerial torpedoes struck Hornet in the engineering spaces, slowing the ship to a stop, becoming an easy target for the three quarter-ton bombs that struck her subsequently. One of these three bombs penetrated four decks before exploding, causing serious fires underneath. Hornet was now completely crippled, but it came at a cost of 25 Japanese aircraft.
ww2dbaseBecause fuel was not in abundance, American aircraft that were launched first went ahead for the enemy formation without hovering overhead to wait for the later-launched comrades. What resulted was the Enterprise aircraft reaching the Japanese first without a concerted effort of a greater number of different types of bombers. The Enterprise aircraft reached the Shokaku group at 0930 and attacked the Japanese carrier. Japanese combat air patrol Zero fighters attacked the unescorted American SBD dive bombers and shot down or turned back several, but three to six of them still successfully planted their 1,000-lb bombs on the flight decks of Shokaku. The damage Shokaku sustained during this battle was so great that she was to be out of the war for the next nine months. Had the Enterprise dive bombers waited for Hornet's torpedo bombers before launching their strike, a couple of well-placed torpedoes at this time could have finished Shokaku. In fact, Hornet's torpedo bombers failed to find Shokaku completely; instead, they gave up their search for the carrier and launched their torpedo ineffectively at cruiser Suzuya around 0930 and headed home. Another group of aircraft, also from Hornet, failed to find the Japanese carriers, and instead made their dives on cruiser Chikuma, exploding a bomb on the bridge and killing many senior officers.
ww2dbaseKondo was an able commander who very quickly figured out, based on the number of American attackers, that there must be two enemy carriers in the vicinity. While Hornet and her escorting destroyers fought the raging fires on the carrier, Kondo ordered a search and strike on the second carrier. Enterprise was found about 1000. This time it was the Japanese who made the mistake of not attacking in coordination. Dive bombers attacked Enterprise without waiting for the arrival of torpedo bombers. Enterprise and battleship South Dakota fired their anti-aircraft weapons with effectiveness, with the carrier downing 7 aircraft and the battleship 26. Out of the 23 bombs released against Enterprise, only two hits and one near-miss were scored. The first hit exploded 50 feet under the forecastle deck, and the second crashed into the third deck before exploding. Despite damage, Enterprise was not disabled.
ww2dbaseDuring the battle, American destroyer Porter was lost, and destroyer Smith's superstructure was damaged from a suicide attack from a torpedo bomber. A subsequent attack attempted to sink the damaged Hornet, but it was ineffective. Cruiser Northampton attempted to tow her to safety, but it took a while to get going. Meanwhile, Rear Admiral Murray transferred his flag from Hornet to cruiser Pensacola. In the early afternoon, Captain Mason of Hornet ordered all wounded and non-essential men to be removed from the ship. Kondo put together a smaller aerial strike force than the morning attack to spearhead a second assault that included surface ships. At 1515, the Japanese aircraft reached Hornet, launching six torpedoes. Northampton cut the towing cables and successfully maneuvered to save herself, but the immobile Hornet was struck by one of them, rapidly flooding the after engine room. At 1540 Japanese dive bombers appeared, but all their bombs missed. At 1550, a formation of six bombers appeared and scored a hit on Hornet's flight deck. At 1702, a small strike force from light carrier Junyo scored a final bomb hit on the carrier's hangar deck. After suffering 111 killed and 108 wounded, she was finally to be scuttled. American destroyer Mustin received the order to launch eight torpedoes at Hornet, and to a great embarrassment, only three hit, and they did not effectively sink the carrier. At 1920, destroyer Anderson fired eight torpedoes as well. Only six of them hit, and Hornet again failed to be sunk. The American ships resorted to using gunfire. After 300 rounds, they failed once again. Hornet finally sank at 0130 on 27 Oct after the arrival of Kondo's fleet at the face of four Japanese 24-inch torpedoes.
ww2dbaseAfter achieving this tactical victory during the fourth major carrier confrontation of the Pacific War, Kondo withdrew his forces to Truk.
ww2dbaseAttacks on New Georgia
9 Dec 1942-24 Jan 1943
ww2dbaseThe New Georgia group of islands was about one hundred miles north of Guadalcanal. The five large islands were originally bypassed by the Japanese in favor of skipping to Guadalcanal, but as the American Marines garrisoned the captured Henderson Field, the strategy was revised as more land-based planes were needed to strike Guadalcanal. On 24 Nov 1942 a large Japanese convoy sailed for a small clearing on the western side of New Georgia island, currently used by a small coconut plantation. Although the convoy attracted American attention as early as 28 Nov, American intelligence saw nothing there based on aerial photographs besides a few scattered small buildings. Finally, on 3 Dec, a sharp-eyed American intelligence expert saw something: the Japanese were building an airfield underneath the neat rows of coconut trees. Whenever a tree needed to be uprooted, overhead wires were laid and dressed with leaves so that the appearance of a tree was maintained in the same location. On 6 Dec, American aircraft from Henderson Field paid a low-level visit to the location and confirmed the existence of the airfield after strafing at the Japanese engineers and troops there.
On 9 Dec, the first major operation against the newly constructed Munda Field was mounted. 18 B-17 bombers began a series of raids by various types of aircraft on Munda. On 13 Dec PBY Catalina aircraft began their occasional night time bombings.
ww2dbaseOn 4 Jan 1943, while US Army infantry were advancing on Guadalcanal on a planned offensive, Halsey sent a fleet to bombard Munda Field to divert any aerial reinforcement that might be sent to disrupt the Army offensive. The bombardment force consisted of three light cruisers and two destroyers under the command of Rear Admiral Walden Ainsworth; the support group behind them had three light cruisers, one heavy cruiser, and three destroyers under the command of Rear Admiral Mahlon Tisdale. Shortly after 0100 in the early morning of 5 Jan, the bombardment commenced. For the next 50 minutes they had deposited nearly 3,000 rounds of 6-in shells and 1,400 rounds of 5-in shells on the Japanese airfield. The next morning, American reconnaissance aircraft visited Munda Field and reported a heavily damaged airfield and no sign of enemy anti-aircraft fire. A retaliatory strike by air came as the ships were steaming home, but it only damaged one of the turrets atop the New Zealand destroyer Achilles that sailed with the support group.
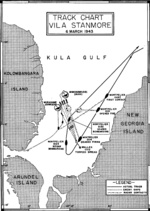
ww2dbaseMunda Field was not the only airfield the Japanese constructed in the New Georgia island group. Another field, Vila, was built on the southern tip of Kolombangara. In the evening of 23 Jan, Ainsworth made another trip up the slot to New Georgia. At 0200 on 24 Jan, his bombardment group consisted of two light cruisers and four destroyers began firing. In the following hour the two light cruisers nearly sent 2,000 rounds of 6-in shells at the direction of the airfield, and the destroyers added 1,500 rounds of 5-in. A few return fires came from coastal batteries, but they were generally ineffective. The Japanese then tried to defend from the air, but a convenient squall together with radar-directed anti-aircraft gunnery saved the American ships.
ww2dbaseAfter day break on 24 Jan, 24 SBD, 17 TBF, and 18 F4F aircraft took off from Henderson Field to follow up on the attack. The American aircraft dropped 23 tons of bombs on Vila by 0800.
ww2dbaseAlthough the "Ainsworth Express" runs, augmented with aerial bombardments, were effective in damaging the Japanese airfields, overall the Japanese engineers were as capable in repairing damaged airfields as the American Marine engineers were with Henderson. The attacks achieved short term objectives by disrupting Japanese capabilities to launch land-based aircraft, but in the long run Halsey knew that the only way he could halt the operations from these new fields was to take them from the Japanese. That was something he was not ready to do, yet.
ww2dbaseBattle of Rennell Island
29-30 Jan 1943
ww2dbaseSome time in the afternoon of 29 Jan 1943, American radar detected a group of unknown aircraft. Since the radar identification system was not very reliable, the American radar operators of Rear Admiral Robert Giffen's Task Force 18 did not know what to relay to the admiral. The aircraft were Japanese, and they were in an exact opposite situation, with friendly submarines stationed near Giffen's force to give them up-to-the-minute status updates. The 31 Japanese torpedo bombers struck Giffen's two escort carriers, three heavy cruisers, three light cruisers, and eight destroyers 50 miles north of Rennell Island, the southern-most island of the Solomon Islands. The torpedo bombers circled the southern rim of the task force and attacked from the east in two groups. The first wave of attacks saw at least one torpedo bomber splash into the waves, and the American ships turned hard to avoid the torpedoes. The second wave came some time later after Giffen's sailors had relaxed their guards. To their surprise, white floating flares were dropped from Japanese aircraft to light the path of the ships' movement, so that the Japanese torpedo bombers knew exactly where to strike in the dim lighting conditions of the early night. At 1931, the bombers launched their torpedoes. One hit cruiser Louisville but it failed to detonate and the rest missed; again at least one bomber was downed by the newly equipped Mark-32 anti-aircraft shells. At 1938, another run was made, and this time the Japanese pilots drew blood. Destroyer Walker was hit astern, and cruiser Chicago at port bow. As Chicago slowed, another hit her starboard side at 1945 and crippled her. At 2000, Giffen ordered a change in course. Between the course change and the darkening conditions, the Japanese pilots lost the task force and headed for home by 2015. They had lost 12 of their fellow pilots on this raid.
ww2dbaseAt 2030, Louisville took station near Chicago, and their crews completed a stunning manual effort to hook up the heavy steel hawser to Chicago's towing tackle. Louisville towed Chicago until day break next day and transferred the tow to tugboat Navajo. As Navajo towed Chicago at four knots and escorted by six destroyers, 12 torpedo bombers of the same "Betty" type struck at 1540 on 30 Jan 1943. The few that got through the combat air patrol launched their torpedoes and fatally wounded Chicago. Captain Ralph Davis of Chicago evacuated his ship in about 20 minutes, and a few moments after the last of the 1,049 survivors left the ship, she sank stern first.
ww2dbaseThe returning Japanese pilots thought they had gotten a battleship, and reported to their superiors as so. The propaganda machine at Tokyo quickly announced this battle as a great victory. Both William Halsey (in the post-battle report) and Samuel Eliot Morison (in his 1949 book) blamed Giffen's inexperience in the theater for the loss of Chicago; Giffen had just been transferred to the South Pacific only days before this battle from Casablanca.
ww2dbaseLanding on the Russell Islands
21 Feb 1943
ww2dbaseThe Russell Islands immediately northwest to Guadalcanal were captured by the Allied forces without significant Japanese opposition.
ww2dbaseBattle of the Bismarck Sea
2-4 Mar 1943
ww2dbaseWhile the Guadalcanal campaign was raging, an equally bitter series of battles was occurring on the island of New Guinea. Under the direction of Japanese war minister Hajime Sugiyama, Japanese troops were sent to seize an airfield near Wau, thirty-two miles from Salamaua. MacArthur's forces were ready for them, routing the Japanese invaders with an Australian brigade. Then Imperial General Headquarters ordered a convoy from Rabaul to land much-needed reinforcements in the Buna-Gona area under the code name of Operation 81. The convoy was consisted of six transports, one old navy supply ship, and one small freighter (carrying a total of 6,600 troops) and was escorted by eight destroyers. The convoy set sail riding on the front of heavy weather to hide their movement, but it was nevertheless discovered hours after their departure from Rabaul, New Britain on 1 Mar 1943. Attacks launched on the same day failed to locate the convoy, but in the following two days the Japanese ships were utterly overwhelmed by Allied air power, leading to the sinking of all eight transport ships and four of the eight destroyers by strafing, bombing, and skip-bombing; additionally, eight Zero fighters and seven Ki-43 fighters were shot down.
ww2dbaseThe aftermath of the battle was ugly for both sides. On 3 Mar 1943, after shooting down US B-17 bomber "Double Trouble", Japanese fighters strafed at the descending parachutes in frustration. Having observed this act, the Americans lowered themselves to the same level during the subsequent attack waves in which they not only dropped bombs on rescuing barges but also machine gunned survivors floating in the water. These attacks on the helpless Japanese survivors would continue through 5 Mar 1943.
ww2dbaseAfter the Battle of the Bismarck Sea, in which the Japanese suffered more than 3,000 killed, the Japanese would never again attempt to run slow transports into the face of American air power.
ww2dbaseWhen Kenney woke MacArthur to inform him the news of the victory at Bismarck Sea, Kenney commented that "I had never seen him so jubilant". MacArthur, at a press conference that soon followed the Bismarck Sea action, declared that the control of the sea "no longer depends solely or even primarily upon naval power, but upon air power operating from land bases held by ground troops". This offended members of the US Navy, but even the admirals could not deny that airpower was a decisive factor in the Pacific War.
ww2dbaseLandings on New Georgia
30 Jun 1943 - 5 Aug 1943
ww2dbaseNew Georgia lay immediately to the northwest of the Russell Islands, housing Japanese airfields at Munda and Vila. To soften up the defenses there before the landing, flights from Henderson bombed New Georgia, resulting in disabling the two before-mentioned airfields (the Japanese would alternatively use Rabaul and Bougainville as launch points of air missions after these two airfields were destroyed). When Japanese submarine Ro-103 spotted Admiral Richmond Turner's amphibious force approaching from the south on 30 Jun, the Japanese commanders were taken by surprise, and were not able to react efficiently to the subsequent landing, though two freighters were sunk by submarines off New Georgia.
ww2dbaseNew Georgia was invaded from five landing points. When the landings took place, a Japanese air raid was launched in attempt to disrupt the landings. A torpedo damaged (later she was abandoned, then sunk in error by American PT boats) Turner's flagship, transport McCawley, but the air raid was more or less ineffective in the intended disruption. The Allied landing force faced much difficulties from reefs, mud, and intense bombardment, in addition to strong resistance from Major General Noboru Sasaki's 5,000 troops.
ww2dbaseMeanwhile, in support of the landings at Rice Anchorage on New Georgia, US cruisers USS Honolulu, USS Helena, and USS St. Louis escorted by destroyers USS Nicholas, USS Strong, USS Chevalier, and USS O'Bannon entered Kula Gulf to shell Japanese positions on Kolombangara and New Georgia. At the same time, Japanese destroyers Niizuki, Nagatsuki, Yunagi, and Satsuki arrived at the north end of Kula Gulf loaded with 1,300 reinforcement troops and 180 tons of provisions bound for Vila, Kolombangara at the south end of Kula Gulf. Upon the commencement of the American shelling at Bairoka Harbor, New Georgia, the Japanese commander, Commander Kunizo Kanaoka, aborted the mission and ordered a withdrawal. As they turned, Niizuki, Nagatsuki, and Yunagi launched a spread of 14 Type 93 "Long Lance" torpedoes into the gulf. At a range of 22,000 yards (11 nautical miles), one of the torpedoes struck and sank destroyer USS Strong. This is believed to be the longest successful torpedo attack of the war. The Americans never detected the presence of the Japanese destroyers and believed Strong was torpedoed by a submarine.
ww2dbaseThe previously obscure island of New Georgia took the Americans a significant amount of time to capture. The major airfield, Munda, fell to the Americans on 5 Aug 1943.
ww2dbaseBattle of Kula Gulf
5-6 Jul 1943
ww2dbaseOn the night of 5 Jul, an American cruiser and destroyer task force was notified of the approach of a Japanese destroyer reinforcement group outbound from Buin. The Americans reversed course and moved to meet them off of Kolombangara. First contact was made at 0106 by Japanese radar (note that the use of radar is rare for the Japanese Navy) aboard Niizuki. The Americans enjoyed an advantage in terms of gunfire, and the Japanese had several ships loaded with combat troops, but as usual the Japanese advantage in torpedoes and tactics made up the difference. Being the keen night warriors as they were, the Japanese launched their newest 24-inch torpedoes against the flashing American guns.
ww2dbaseThe Americans maintained a line-ahead formation and began firing at 0157. They quickly demolished Niizuki, which drew fire from every American cruiser. Japanese torpedoes were already in the water, however, and at 0203 they hit Helena, which lost her bow back to the No. 2 turret, and then took another two hits which sank her. Meanwhile, the Japanese had several vessels damaged and one destroyer sunk (killing Admiral Akiyama) by gunfire, and Nagatsuki had run aground (she was destroyed by bombing runs on the next day). Both forces began a general retirement.
ww2dbase165 of Helena's survivors were missed by general rescue efforts. They hung on to various floating devices, and eventually made their ways to the island of Vella Lavella. They would be aided by local Australian coast watchers and friendly locals. They were rescued by destroyers on 16 Jul.
ww2dbaseAs the battle wore on, both sides still had destroyers in the area attempting to rescue survivors; one Japanese and two American. Around 0500 Amagiri and Nicholas exchanged torpedoes and then gunfire. Amagiri was hit and retired, leaving Niizuki's survivors to their fate. The Americans, by contrast succeeded in rescuing many of Helena's survivors. The final casualty was Nagatsuki; abandoned by her crew in the morning after they failed to get her afloat, she was bombed into a sinking state by US planes.
ww2dbaseThe losses were about even for both sides. Given the disadvantages the Japanese had labored under, the Americans really ought to have done better. This battle is intriguing, too, for the fact that it was the Japanese who used their search radar effectively. However, American radar gunfire control (which the Japanese still did not have) had allowed them to inflict rapid damage to the opposing force.
ww2dbaseDuring the actions at Kula Gulf, the Japanese were successful in landing over 2,000 troops.
ww2dbaseBattle of Kolombangara
12-13 Jul 1943
ww2dbaseA Tokyo Express led by Rear Admiral Shunji Izaki and his light cruiser Jintsu and four destroyer-transports was met by Ainsworth's Task Group 18. New Zealand light cruiser Leander and other light cruisers and destroyers were targeted by Japanese torpedoes before they opened gunfire against the Japanese. The Japanese were radar-less, but they were eqiuped with radar direction-finding equipment which aided them greatly, including the early clues of American ship locations that allowed them to fire their torpedoes early.
ww2dbaseThe veteran Jintsu was destroyed by 2,600 rounds of cruiser shells, killing Admiral Izaki himself. The Americans lost a destroyer, Gwin, and sustained heavy damage on light cruisers Honolulu and St. Louis. The Japanese landed 1,200 troops on Kolombangara and withdrew to Buin in Bougainville. This confrontation was another example of Japanese skillfulness with torpedoes; not only that the Japanese torpedoes could travel much further (21 miles!) than their inferior American counterparts, the Japanese could also reload their torpedo tubes twice as quickly than the American sailors.
ww2dbaseBattle of Vella Gulf
6-7 Aug 1943
ww2dbaseYet another Japanese destroyer reinforcement group, this time headed for Kolombangara, was intercepted by an American destroyer force near Vella Lavella, under the command of American Commander Frederick Moosbrugger. The Americans used the black backdrop of Kolombangara to hide their ships. They also avoided using their guns until their torpedoes were in the water. By the time Shigure, which was at the tail end of the Japanese column (with Tameichi Hara aboard) spotted the Americans at 2344, the American fish were about a minute away from their targets. As Shigure began launching an eight-fish salvo, the three lead Japanese destroyers were hit within moments of each other. Shigure, too, was hit by a dud torpedo as she turned away. The fish punched a hole in her rudder.
ww2dbaseThe Americans then closed in to finish the job with gunfire. Practically no resistance came from the crippled Japanese destroyers. Shigure had no choice but to run for her life. In all, the Japanese had lost three ships and over 1,500 men (900 of which were land troops). The Americans suffered not a single casualty, much attributed to the well-drilled American sailors. The Japanese survivors in the water refused rescue from the American destroyers.
ww2dbaseThis battle is important because for the first time American destroyers had demonstrated that, given the opportunity, they could meet and best their opposite numbers. By being relieved of their normal duties of screening cruisers, and the linear tactics that role had thus far imposed, the American DDs were able to employ innovative torpedo tactics which had worked beautifully. The Japanese Navy had been served notice that its reign of nighttime torpedo supremacy was at an end.
ww2dbaseBattle off Horaniu
18 Aug 1943
ww2dbaseBy mid-July, the situation on Kolombangara was such that the Japanese were making every effort to remove heir troops. American troops were by now overpowering the Japanese, totaling 6,300 men on the island. A Japanese barge convoy, escorted by destroyers, was sent out on 17 Aug to attempt the evacuation mission. An American destroyer force had come north that night to intercept and destroy the barges.
ww2dbaseBoth forces spotted each other at 0029 on 18 Aug. The Japanese launched torpedoes at very long range, but the Americans had formed up line abreast and thus combed their wakes. After another series of maneuvers, however, the two destroyer forces found themselves line abreast and within long gunfire range. Both groups hammered away at each other, but were generally ineffective. At around 0100 the Isokaze's radar (erroneously) detected another American force closing from the south, at which point the Japanese retired. In the interim, though, most of the Japanese barges had scattered, leaving only two for the Americans to find and sink.
ww2dbaseNeither side had been particularly impressive this night. The only redeeming feature for the Americans was the fact that with radar controlled gunfire they had at least scored more near-misses and straddles than their enemy. The other important thing to note is that, once again, the Americans had demonstrated that their destroyers (at least) were beginning to learn how to take the sting out of Japanese torpedo tactics.
ww2dbaseOn 14 Sep, the Japanese garrison on Kolombangara would fall to American control.
ww2dbaseBattle of Vella Lavella
6 Oct 1943
ww2dbaseIn October, the Japanese ran another destroyer barge force towards Vella Lavella to try and rescue the 600-some soldiers stranded there, in what Dan van der Vat said was "a militarily correct decision... to evacuate it". An American destroyer group was dispatched to block this movement. Interestingly, a relatively large task force was sent to rescue less than one battalion, but for once the Japanese would enjoy a numerical advantage as they outnumbered the American destroyers nine to six (although three of them were converted to troop carriers). This task force was led by Rear Admiral Masuji Ijuin and it came from Rabaul. The American counterpart was led by Captain Frank Walker. Walker decided not to join his two groups of three destroyers before approaching the likely scene of battle. Thus he would bring his three 'tin cans' up against a much superior force.
ww2dbaseThe Japanese actually spotted the Americans visually a minute before American radar returned the favor, but the Japanese were unsure of their sighting for another several minutes. As luck would have it, their course and speed were such that they stood a good chance of crossing the American 'T'. However, the Japanese commander then engaged his squadron in a complex series of maneuvers which wasted the initial advantage. At 2256, both columns opened up on each other simultaneously.
ww2dbaseThe American destroyer Chevalier was crippled almost immediately to a torpedo, and the next destroyer in line O'Bannon then proceeded to ram her sister. However, American gunfire was simultaneously tearing Yugumo apart. After a brief exchange of further gunnery between Selfridge, Shigure and Samidare, the Japanese retreated the way the came, apparently fearing larger American forces were approaching the area (by the time Captain Harold Larson's three destroyers came by, the Japanese were already gone). The Japanese barges, however, accomplished their mission and rescued all the remaining Japanese troops on the island. All in all, not an impressive showing for the Americans, who should have waited to join forces before attacking the Japanese.
ww2dbaseAs usual, both side exaggerated claims of enemy ships sunk, but in conclusion the Japanese scored a small tactical victory here. However, at the end of this night action, Japanese presence would be completely withdrawn from the central Solomons region.
ww2dbaseAttack on Bougainville
1 Nov 1943
ww2dbaseThe next target with the Island Hopping campaign was the island of Bougainville, a former German colony that was mandated to Australia in 1919 after WW1. Nearly the entire 130-mile by 30-mile area was dense jungle, with a exception of a small coastal plain at the southern end. The Japanese Bougainville garrison totalled 60,000 men, deployed on Bougainville, Shortlands, Buka, and Treasury islands. There were a total of five military airfields under Japanese control. To attack Bougainville, Admiral Halsey's Third Fleet and Admiral Fitch's land-based aircraft went into MacArthur's jurisdiction. The amphibious force consisted of Major General Roy Geiger's US Marines.
ww2dbaseTo soften the landings, American aircraft bombed the five Japanese airfields late in October. Although these bombings confused the Japanese in that they could not determine where the Americans would strike next, the bombings were a bit overrated as over 200 aircraft were still operational for the defenders at the time of the landings. Admiral Koga decided to deploy 173 aircraft, taken away from the precious carriers, to the area in determination to destroy the next wave of American attackers by air power. This defense plan was Operation RO.
ww2dbaseTreasury Islands was attacked by New Zealand troops on 17 Oct, with the goal of gaining a logistical base for further Bougainville actions. On the main island of Mono, well dug-in machine gun nests were giving Allied troops a difficult time. Captain Robert Briscoe of the light cruiser Denver recalled how the landing troops took care of this obstacle in a brutal and unorthodox manner:
ww2dbaseThe Treasury Islands were under Allied control by 6 Nov.
ww2dbaseOn 1 Nov 1943, the Americans landed a large amphibious force on Bougainville under the command of Major General Turnage of the US Marines. The landing force was counterattacked by two waves of air attacks, but to no significant impact. The Japanese forces at the particular landing site totaled less than 300, therefore posing only a small threat despite the carefully laid machine gun cross fire and artillery. Once the forces headed inland, however, the difficulty began. The Marines soon found out that the naval bombardment "had accomplished nothing", as noted in Marine Corps' official history. The men faced Japanese defenders well entrenched and well hidden in the dense tropical jungles.
ww2dbaseWith the attack on Bougainville taking place, he Americans expected a vigorous response from the Japanese from the sea, and indeed response was given. Admiral Sentaro Omori sortied from Rabaul at once with a powerful surface force of two heavy cruisers, two light cruisers, and six destroyers. The American Task Force 39 was under the command of Rear Admiral Stanton Merrill. Having sent most of their assault transports out of the danger zone before nightfall, Merrill awaited the Japanese with four light cruisers and eight destroyers. The advantage in both gunfire and torpedoes clearly lay with the Japanese.
ww2dbaseFortunately for the Americans, the Japanese force was a 'pick-up' team which hadn't practiced together, and Omori tried playing a game that was a little over his head. Confused by conflicting reports he was receiving from his scout planes as to the composition of the American force to his south, he executed a series of 180-degree turns (in pitch blackness) which were designed to give his aircraft more time to bring him information. Instead, all they did was throw his squadron into disarray, leaving his screening force far out of position, just as the Americans arrived on the scene. The Americans, coming upon the Japanese screen, launched torpedoes first, and then opened with the cruisers' 6-inch guns. The Japanese screening force, upon spotting American destroyers, tried desperately to evade the torpedoes they knew to be in the water, and ended up either colliding with each other or suffering near-misses. Sendai nearly hit Shigure, and Samidare sideswiped Shiratsuyu, staving in her hull and putting her out of the fight. Sendai was then buried in 6-inch gunfire.
ww2dbaseOmori tried bringing his main body into the battle. This only succeeded in causing further collisions, as Myoko tore Hatsukaze's bow off, and Haguro nearly hit two other destroyers. A brief, inconclusive fight followed between the two Japanese heavies and the four American lights. Although the Japanese launched a large salvo of torpedoes, they were ineffective. The Americans achieved several gunfire straddles, but failed to hit their targets. At 0229 Omori ordered a general withdrawal. The Americans found the hapless Hatsukaze (Myoko was still wearing her bow when she returned to Rabaul) and sank her with gunfire.
ww2dbaseThe Japanese had clearly lost this fight, failing to bring their heavy units to bear conclusively, and wiping out most of their own screening destroyers through their own ill-considered maneuvers. The invasion of Bougainville would not be stopped this night. For his defeat, Omori was relieved of his command upon returning to Rabaul.
ww2dbaseDuring the first week of Nov 1943, while the Americans raided Rabaul (see New Guinea-Papua Campaign, Phase 3), Americans reinforced their beachhead on Bougainville, while the Japanese sneaked two convoys by the Americans ships to land more troops on the northern tip of the island. The aircraft Koga ordered to reinforce the area were sent on air raids to disrupt American operations, but no little effect, while wearing away irreplaceable Japanese pilots. However, the usual practice of exaggerating damange reports led to Koga's declaration of Operation RO a success, and received a personal word of thanks from Emperor Showa. American progress on Bougainville slowed during the rest of Nov 1943.
ww2dbaseBattle of Empress Augusta Bay
1-2 Nov 1943
ww2dbaseOn 1 Nov, the US 3rd Marine Division invaded the beaches of Empress Augusta Bay, backed by four light cruisers and eight destroyers. As a response, a powerful naval force of two heavy cruisers, two light cruisers, and six destroyers sailed from Rabaul steamed with air cover under the command of Admiral Sentaro Omori. The Americans made radar contact at 0230 in the morning of 2 Nov and immediately launched a destroyer torpedo attack. The Japanese fleet dodged the torpedo run, but in turn the formation was scattered. At 0250, American cruisers opened fire, quickly disabling cruiser Sendai. A series of Japanese mis-maneuvers led to two collisions; it was not until 0313 that the Japanese fleet pulled together and began firing on the American ships. The battle did not last long after that point as the American ships turned and withdrew from the battle. While the battle was rather inconclusive, the Americans achieved their goal in preventing Japanese interference with the operation.
ww2dbaseThis engagement was also known as Battle of Gazelle Bay, Operation Cherry Blossom, and the Sea Battle of Bougainville Bay Shore.
ww2dbaseBattle of Cape St. George
26 Nov 1943
ww2dbaseWith the Americans now consolidating their hold over Bougainville, the Japanese began beefing up troops and supplies on the island of Buka. On November 25, they put together yet another 'Tokyo Express' of five destroyers, three of them laden with troops, and sent them out of Rabaul. This force was commanded by Captain Kiyoto Kagawa. Waiting for them were six American destroyers. The Japanese succeeded in dropping off their loads at Buka, but trouble began on the way back home.
ww2dbaseAmerican Navy Captain Arleigh Burke's radar spotted the Japanese first, allowing the Americans to close and launch torpedoes without being initially detected. Both of the Japanese screening destroyers were hit, sinking the Onami and crippling the Makinami. The Americans then closed in on the destroyer-transports, who scattered and ran for it. Yugiri didn't make it, being pounded by several opponents. The crippled Makinami was also sunk. The American forces tried a stern chase of the other two fleeing Japanese destroyers, but were unable to catch them.
ww2dbaseNo realized it at the time, but this was the last 'Tokyo Express', and the last surface fight in the Solomon Islands. Freed from screening duties, US destroyers had again held their own against their vaunted Japanese adversaries. There would be no more major naval battles until the invasion of Saipan in the Mariana Islands.
ww2dbaseSources:
Bruce Gamble, Fortress Rabaul
William Manchester, American Caesar
Samuel Eliot Morison, The Struggle for Guadalcanal
Dan van der Vat, The Pacific Campaign
Combinedfleet.com
Wikipedia
Last Major Update: May 2007
Solomon Islands Campaign Interactive Map


Photographs
 |  |  |  |
Maps
 |  |  |  |
Solomon Islands Campaign Timeline
| 23 Jan 1942 | In the Solomon Islands, the Japanese landed at Kieta, Bougainville. |
| 31 Mar 1942 | Japanese troops occupied Bougainville in the Solomon Islands. |
| 1 Apr 1942 | Japanese troops landed at Buka and Santa Isabel in the Solomon Islands. |
| 6 Apr 1942 | Japanese troops landed on Bougainville, Solomon Islands and Lorengau, Admiralty Islands. |
| 28 Apr 1942 | Coast Watchers reported that a Japanese flying boat base was being built in the upper Solomon Islands. |
| 7 Aug 1942 | Aircraft from USS Saratoga flew several strikes against targets on Guadalcanal and in support of landings on Tulagi in the Solomon Islands. Pilot Lt(jg) Charles Tabberer was one of five out of eight pilots to go missing over Tulagi. |
| 24 Aug 1942 | A Japanese force centered around carriers Shokaku and Zuikaku sailed down into the Solomon Islands with light carrier Ryujo and cruiser tone operating independently south of the main fleet. At 0415, 19 torpedo bombers and 7 seaplanes were launched to search for American ships. At 1250, the search plane from cruiser Chikuma reported sighting USS Saratoga and USS Enterprise; the search plane was quickly shot down, but the Japanese nevertheless gained an idea of the American position. Shokaku launched 18 dive bombers and Zuikaku launched 9 dive bombers starting at 1300 hours. At 1315, two bombers from Enterprise surprised Shokaku, but the torpedo they launched would fail to hit the Japanese carrier. At 1400 hours, a second strike was launched by Shokaku (9 dive bombers and 3 fighters) and Zuikaku (18 dive bombers and 6 fighters). At around the same time, Battle of the Eastern Solomons crew its first casualty when Ryujo was discovered and fatally damaged by several 1,000-pound bombs. At 1440, the first attack wave from the Japanese carriers attacked Enterprise, scoring three bomb hits (70 were killed, 70 were injured), but the Japanese would lose 18 dive bombers and 6 fighters in the engagement. The second wave failed to locate the American carriers and returned before dark. Japanese warships attempted to engage the US fleet after dark, but the force failed to locate the American fleet, and discontinued the search at 2330 hours. |
| 25 Aug 1942 | Before dawn, Japanese destroyers Kagero, Isokaze, Kawakaze, Mutsuki, and Yayoi bombarded Henderson Field, Guadalcanal in the Solomon Islands, causing little damage. At 0600 hours, six SBD dive bombers from Henderson Field attacked a Japanese convoy 64 miles northeast of Santa Isabel Island, sinking troop transport Kinryu Maru and damaging cruiser Jintsu (24 were killed). Four US Army B-17 bombers arrived shortly after, sinking Japanese destroyer Mutsuki (41 were killed, 11 were injured) as Mutsuki rescued survivors from the Kinryu Maru sinking. |
| 1 Sep 1942 | US B-17 bombers damaged Japanese flying boat support ship Akitsushima and destroyer Akikaze off Buka Island in the Solomon Islands. |
| 2 Sep 1942 | US B-17 bombers damaged Japanese minelayer Tsugaru in the northern Solomon Islands; 14 were killed. |
| 24 Sep 1942 | Dauntless dive bombers of US Marine Corps VMSB-231 squadron and US Navy VS-3 squadron from Henderson Field, Guadalcanal, Solomon Islands attacked Japanese destroyers Umikaze and Kawakaze in the western Solomon Islands; they heavily damaged Umikaze (8 were killed) and forced the convoy to turn back. On the same day, US Army B-17 bombers attacked the Japanese Navy base on Shortland island, damaging seaplane carrier Sanuki Maru. |
| 5 Oct 1942 | Task Force 17 (USS Hornet, Northampton, Pensacola, Juneau, San Diego, 3 destroyers) struck Japanese installations around the southern end of Bougainville in the Solomon Islands (Buin-Faisi-Tonolai Raid). |
| 11 Oct 1942 | Vice Admiral Chuichi Nagumo led a fleet out of Truk, Caroline Islands consisted of Shokaku, Zuikaku, Zuiho, Kumano, Amatsukaze, Hatsukaze, Tokitsukaze, Yukikaze, Arashi, Maikaze, Teruzuki, and Hamakaze to cover a major Guadalcanal convoy reinforcement. |
| 20 Oct 1942 | Japanese submarine I-176 attacked and damaged USS Chester in the Solomon Islands area. |
| 24 Oct 1942 | Portland was struck with three Japanese torpedoes that did not detonate during the Battle of the Santa Cruz Islands |
| 26 Oct 1942 | Shokaku was heavily damaged by bombs during the Battle of Santa Cruz Islands. Four to six bombs struck the flight deck; one struck aft of the island and the rest were grouped around the amidships and aft elevators. Large fires were started, and the flight deck was completely buckled by the blasts. Though sixty officers and men were killed, since no aircraft were aboard, no fuel was active and damage control was able to extinguish the fires and save the ship. Admiral Nagumo transferred his flag to destroyer Arashi. Then, with the damaged light carrier Zuiho, Shokaku was detached and ordered home to Truk escorted by Hatsukaze and Maikaze. |
| 26 Oct 1942 | At the Battle of Santa Cruz Islands, US forces achieved victory but saw USS Enterprise, USS South Dakota, and USS San Juan damaged. Aircraft carrier USS Hornet (Yorktown-class) was badly damaged from aerial bombs and torpedoes and then finally hit by three Type 93 torpedoes launched from Japanese destroyers Akigumo and Makigumo which caused her to sink 30 minutes later. On the Japanese side, carriers Shokaku and Zuiho were damaged by dive bombers from USS Hornet and USS Enterprise, respectively. |
| 26 Oct 1942 | US Navy Ensign George L. Wrenn of VF-72 from the USS Hornet engaged Japanese aircraft attacking the US fleet. He shot down five Nakajima B5N torpedo bombers during the sortie. The Hornet was sunk during the battle and Wrenn had to be recovered aboard the USS Enterprise. |
| 26 Oct 1942 | Tanikaze participated in the Battle of Santa Cruz Islands and then escorted the damaged heavy cruiser Chikuma toward Truk, Caroline Islands. |
| 26 Oct 1942 | Kumano screened the carriers Shokaku, Zuikaku, and Zuiho in the Battle of the Santa Cruz Islands. |
| 26 Oct 1942 | Destroyer USS Shaw went to assist destroyer USS Porter that had been struck by a runaway American aerial torpedo. Shaw took Porter's crew aboard and then scuttled Porter. |
| 27 Oct 1942 | USS Hornet (Yorktown-class) was lost during the naval Battle of Santa Cruz. |
| 28 Oct 1942 | Destroyer USS Shaw transferred survivors of USS Porter to battleship USS South Dakota while en route Efate in the New Hebrides. |
| 13 Nov 1942 | Japanese troops arrived at Munda Point, New Georgia, to construct an airfield. Detecting this movement, three squadrons of US B-24 bombers flew to Iron Range airfield in northern Queensland, Australia to stage an attack on the future airfield. |
| 14 Nov 1942 | Three squadrons of US B-24 bombers moved from Iron Range airfield in northern Queensland, Australia to Port Moresby, Australian Papua and prepared for a strike on the under-construction airfield at Munda Point, Bougainville, Solomon Islands. |
| 14 Nov 1942 | Japanese Furutaka-class Heavy Cruiser Kinugasa was sunk by planes based at Henderson Field on Guadalcanal and by carrier planes from USS Enterprise as Kinugasa was withdrawing from a bombardment of Guadalcanal. |
| 15 Nov 1942 | US B-24 bombers attacked the Buin-Faisi anchorage near the under-construction Japanese airfield at Munda Point, Bougainville, Solomon Islands; the attack resulted in minimal damage to the Japanese while two US aircraft were lost (1 to battle damage, another in an emergency landing on a beach). |
| 12 Dec 1942 | Amagiri and Yugure departed Shortland Islands, Solomon Islands at 1230 hours on a transport run to Rekata Bay, Santa Isabel Island, Solomon Islands. |
| 15 Dec 1942 | Amagiri and Yugure departed Shortland Islands, Solomon Islands at 1230 hours on a transport run to Rekata Bay, Santa Isabel Island, Solomon Islands. |
| 17 Dec 1942 | The Japanese completed a 4,700-foot long airstrip at Munda Point, New Georgia, Solomon Islands. |
| 26 Dec 1942 | Yugure, Urakaze, Tanikaze, Isonami, Inazuma, and Arashio departed Rabaul, New Britain, Bismarck Islands to transport 600 troops and supplies to occupy Wickham Anchorage, Vangunu, New Georgia, Solomon Islands. |
| 27 Dec 1942 | Yugure, Urakaze, Tanikaze, Isonami, Inazuma, and Arashio briefly stopped at Shortland Islands, Solomon Islands at 1335 hours, and then arrived at Wickham Anchorage, Vangunu, Solomon Islands at 2125 hours. The ships unloaded the 600 troops and supplies and departed at 2240. |
| 2 Jan 1943 | US Marine Corps and US Army aircraft attacked 10 Japanese destroyer transports west of Rendova, Solomon Islands. |
| 5 Jan 1943 | In the early morning darkness, cruisers USS Nashville, USS St. Louis, and USS Helena (St. Louis-class) with destroyers USS Fletcher and USS O'Bannon conducted a nighttime bombardment of the Japanese-held airstrip at Munda on New Georgia, Solomon Islands. |
| 15 Jan 1943 | US Navy SBD Dauntless dive bombers from Henderson Field, Guadalcanal and USAAF B-17 bombers attacked a convoy of nine Japanese destroyers northeast of New Georgia, Solomon Islands; four Japanese destroyers were damaged. A lone B-17 bomber attacked the Japanese airfield on Ballale island, Solomon Islands. To the north in the Caroline Islands, three transports escorted by destroyers departed from Truk for Bougainville with Japanese Army troops transferred from China. |
| 17 Jan 1943 | A Japanese convoy carrying Japanese Army troops transferred from China departed Truk, Caroline Islands for Shortland Islands, Solomon Islands. |
| 18 Jan 1943 | USAAF B-17 and P-39 aircraft sank Japanese cargo ship Yamafuku Maru off Shortland Islands, Solomon Islands. |
| 23 Jan 1943 | After sundown and into the following day, American cruisers and destroyers bombarded Kolombangara, New Georgia, Solomon Islands. |
| 23 Jan 1943 | After sunset, the Task Force 67 Bombardment Group consisting of cruisers USS Nashville and USS Helena with destroyers USS Nicholas, USS DeHaven, USS O’Bannon, and USS Radford split off from the rest of the force and proceeded toward their objective. |
| 24 Jan 1943 | American destroyers bombarded Japanese fuel and munitions dumps in the Stanmore area, Kolombangara, Solomon Islands. Later on the same day, US Navy carrier aircraft attacked the same targets. |
| 24 Jan 1943 | Cruisers USS Nashville and USS Helena with destroyers USS Nicholas, USS DeHaven, USS O’Bannon, and USS Radford made a nighttime bombardment of Vila airstrip, Kolombangara, Solomon Islands, followed by repelling a nighttime Japanese air attack. The destroyers then anchored at Tulagi, Solomon Islands. |
| 29 Jan 1943 | The Battle of Rennell Island began with land-based Japanese aircraft attacked US Navy TF 18 ships. USS Chicago was damaged and was taken under tow. |
| 30 Jan 1943 | Battle of Rennell Island in the Solomon Islands ended with a Japanese victory and the sinking of USS Chicago. |
| 15 Feb 1943 | The US military established Commander, Aircraft, Solomons in the Solomon Islands with Rear Admiral Charles Mason as its head. It was to oversee all air operations in the region across Army, Navy, and Marine ground-based aircraft. |
| 21 Feb 1943 | In the Russell Islands, US Marine Corps 3rd Raider Battalion landed at Pepesala Point, Pavuvu while US Army 43rd Infantry Division landed on Banika. Among the escorts for the Army landing force was the destroyer USS Saufley. |
| 23 Feb 1943 | Japanese Navy Yokosuka 7th Special Naval Landing Force disembarked 1,807 men at Kolombangara, New Georgia. |
| 28 Feb 1943 | Japanese convoy Operation 81 assembled at Rabaul, New Britain and readied for departure scheduled for the next day. The convoy was consisted of 6 transports (carrying 6,000 troops and supplies), 1 old navy supply ship (carrying 600 Special Naval Landing Force troops), and 1 small freighter (carrying 1,650 drums of aviation gas); it was escorted by 8 destroyers. |
| 1 Mar 1943 | The Japanese convoy Operation 81 (consisted of 6 transports, 1 old navy supply ship, and 1 small freighter, carrying a total of 6,600 troops) departed Rabaul, New Britain. The convoy was discovered by Lieutenant Walt Higgins' B-24 patrol along the northern coast of New Britain at 1500 hours; 7 B-17 bombers were dispatched to attack, but they failed to locate the convoy. |
| 2 Mar 1943 | In Battle of the Bismarck Sea, US and Australian fighters and short range bombers attacked Lae, Australian Papua while US B-17 bombers located and attacked the Japanese convoy Operation 81 at 0930 hours. The first attack on the convoy sank Kyokusei Maru. In the afternoon, another wave of bombers attacked the convoy, damaging Teiyo Maru. After dark, a Catalina aircraft of Australian 11 Squadron maintained contact with the convoy. |
| 3 Mar 1943 | Battle of the Bismarck Sea: In the morning, 7 Australian 100 Squadron Beaufort aircraft took off from an airfield on the coast of Milne Bay, Australian Papua to attack the Japanese convoy Operation 81; only 2 of them would reach the convoy due to poor weather, and the attack would cause no damage. Shortly after, more than 100 aircraft took off from Port Moresby, Milne Bay area, and the new Dobodura airfield, assembled over Cape Ward Hunt, and attacked the convoy beginning at 0955 hours; 7 transports and 3 destroyers were sunk or damaged by a combination of strafing, bombing, and skip-bombing. Rear Admiral Yutaka Kimura and Lieutenant General Hatazo Adachi had to be rescued off of damaged destroyers Shikinami and Tokitsukaze, respectively. In the late morning, several waves of bombers attacked the convoy; when one US B-17 bomber, "Double Trouble" was fatally damaged, the crew parachuted, and Japanese fighters shot at the parachutes, which was observed by the other Americans. In the mid-afternoon, B-25 bombers and B-17 bombers attacked the convoy, fatally damaged destroyer Arashio; after expending their bombs, the Americans strafed many Japanese survivors floating in the water. |
| 4 Mar 1943 | The Battle of the Bismarck Sea continued as US bombers sank already fatally damaged and abandoned destroyer Tokitsukaze and sank 6 landing barges that had arrived to rescue survivors of ships sunk on the previous day. After expending their bomb loads, American air crews strafed Japanese survivors floating in the sea. |
| 5 Mar 1943 | US B-25 bombers machine gunned a cluster of life rafts occupied by Japanese survivors of ships sunken during the Battle of the Bismarck Sea. |
| 6 Mar 1943 | Japanese aircraft attacked American positions at the Russell Islands in the Solomon Islands for the first time; these positions were manned by the US Marine Corps 11th Defense Battalion. Meanwhile, US warships bombarded the Vila-Munda area in New Georgia. |
| 6 Mar 1943 | Shortly after midnight, destroyers USS Fletcher, USS Nicholas, USS O’Bannon, and USS Radford formed a bombardment line offshore of the Japanese airstrip at Munda, New Georgia, Solomon Islands and shelled the airstrip. By daybreak, the destroyer group had entered Purvis Bay, Tulagi, Solomon Islands. |
| 7 Mar 1943 | Douglas MacArthur issued a communiqué to USAAF squadrons in the South Pacific to congratulate them for the overwhelming success at the Battle of the Bismarck Sea. |
| 8 Mar 1943 | American forces were attacked by Japanese troops on Hill 700 in Bougainville, Solomon Islands. |
| 9 Mar 1943 | The Japanese Navy Kure 6th Special Naval Landing Force landed between Bairoko and Enogai and near the Munda airfield on New Georgia in the Solomon Islands. |
| 13 Mar 1943 | In Bougainville, Solomon Islands, Japanese troops ended their assault on American forces at Hill 700. |
| 16 Mar 1943 | Shortly after midnight, destroyers USS Nicholas, USS Taylor, USS Radford, and USS Strong formed a bombardment line in Kula Gulf offshore of the Japanese airstrip at Vila, Kolombangara, Solomon Islands and shelled the airstrip. The destroyers rejoined the cruiser group later that day. |
| 21 Mar 1943 | PBY Catalina aircraft delivered a group of US Marine Corps scouts at Segi Plantation, New Georgia for a reconnaissance mission; they would later report that Segi's beaches would not accommodate a large landing force. |
| 25 Mar 1943 | The Japanese offensive at Bougainville in the Solomon Islands was halted. |
| 31 Mar 1943 | Vice Admiral Ryunosuke Kusaka launched a 2-wave fighter sweep (32 fighters and 25 fighters, respectively) down the Slot in the Solomon Islands to draw out Allied fighters. About 30 Guadalcanal-based US F4F fighters, 8 P-38 fighters, and a few F4U fighters engaged them over the Russell Islands. 9 Japanese Zero fighters, 5 US F4F Wildcat fighters, and 1 US F4U Corsair fighter were shot down in the action. |
| 7 Apr 1943 | In the morning, at Lakunai field at Rabaul, New Britain, Isoroku Yamamoto personally observed the launch of some of the aircraft that was to form a large aerial offensive (to be consisted of 157 Zero fighters and 67 D3A dive bombers). At Tulagi in the Solomon Islands, this Japanese attack force sank 1 US destroyer, 1 New Zealand corvette, and 1 tanker, while also damaged the oiler that was fueling the New Zealand corvette at the time of the attack. The Japanese aircraft were engaged by US Marine Corps F4F fighters; during the combat, 12 Zero fighters, 9 D3A dive bombers, and 7 F4F fighters were shot down. 3 D3A dive bombers were lost en route back to their bases. Under the cover of the air attack, a reinforcement convoy arrived at Kolombangara, New Georgia. |
| 11 Apr 1943 | 73 Zero fighters and 27 D3A carrier dive bombers attacked Oro Bay near Dobodura, Australian Papua, sinking 1 US cargo ship, sinking 1 US destroyer, damaging 1 transport, and damaging 1 Australian minesweeper. |
| 14 Apr 1943 | 23 Japanese dive bombers, 44 medium bombers, and 129 fighters attacked Milne Bay, Australian Papua; 44 Allied fighters rose in response. In the air, 1 Australian P-40 fighter was shot down and another was damaged, and additional Australian P-38 aircraft was destroyed on landing. Three Allied ships were damaged. For the Japanese 5 G4M bombers, 3 D3A dive bombers, and 1 Zero fighter were lost in combat. |
| 16 Apr 1943 | A scheduled fighter sweep from Rabaul, New Britain was cancelled as a reconnaissance aircraft failed to return from northeastern New Guinea island region. Despite of this cancellation, Isoroku Yamamoto announced the successful conclusion of the I-Go air offensive. |
| 18 Apr 1943 | Admiral William Halsey and General Douglas MacArthur met at Brisbane, Australia. They agreed that the tentative date for the New Georgia invasion was to be 15 May, and that a US Marine Corps defense battalion, a US Navy construction battalion, and a US Army regimental combat team should be transferred to the theater to support the invasion. |
| 7 May 1943 | Shortly after midnight, cruisers USS Honolulu, USS St. Louis, and USS Nashville with destroyers USS O'Bannon, USS Taylor, USS Strong, and USS Chevalier made one circuit through Vella Gulf in the Solomon Islands covering minelayers laying mines in Blackett Strait. |
| 10 May 1943 | Japanese aircraft from Rabaul attacked American positions in the Russell Islands, Solomon Islands, but the attack was largely turned back by American fighters. |
| 12 May 1943 | Cruiser USS St. Louis with destroyers USS Fletcher and USS Jenkins detached from the task force and proceeded on their prong of the attack plan set for the following day. |
| 13 May 1943 | Shortly after midnight, cruisers USS Honolulu, USS Nashville, and USS Helena, with destroyers USS Nicholas, USS O’Bannon, USS Taylor, USS Strong, and USS Chevalier entered Kula Gulf, Solomon Islands where they conducted a shore bombardment of Japanese positions along both sides of the gulf. Cruiser USS Nashville suffered an explosion inside her No. 3 turret that killed 18 men and injured 17. USS Nicholas and USS Chevalier both suffered gun casualties in their 5-inch gun mounts where, in each case, a hang-fire caused an explosion and fire causing no casualties. |
| 13 May 1943 | Shortly after midnight, cruiser USS St. Louis with destroyers USS Fletcher and USS Jenkins formed a bombardment line offshore of the Japanese airstrip at Munda, New Georgia, Solomon Islands and shelled the airstrip. |
| 19 May 1943 | 30 TBF Avenger aircraft of US Marine Scout-Bomber Squadron 143 and US Navy Tropedo Squadron 11 mined waters off Buin, Bougainville, Solomon Islands. |
| 3 Jun 1943 | Operation Toenails: The Allies invaded New Georgia, Solomon Islands. |
| 12 Jun 1943 | Aircraft of Japanese 11th Air Fleet from Rabaul were launched to attack American positions in the Russell Islands, Solomon Islands, but this force was turned back by Allied fighters. |
| 13 Jun 1943 | A contingent of US Army, US Navy, and US Marine Corps officers were landed at Segi, New Georgia to evaluate possible landing locations for an invasion. |
| 14 Jun 1943 | Admiral John Newton relieved Admiral William Halsey as the commanding officer of the South Pacific area. Combined with this personnel change was the transfer of the Solomon Islands region to the Southwest Pacific command. |
| 16 Jun 1943 | Major General John Hester announced the date for the New Georgia invasion to be 30 Jun 1943. On the same day, a group of Japanese dive bombers and fighters unsuccessfully attacked American positions in the Russell Islands, Solomon Islands; a large number of the aircraft were destroyed. |
| 17 Jun 1943 | The US Marine Corps 9th Defense Battalion was relieved of its responsibility in the defense of Guadalcanal, Solomon Islands and was ordered to begin training for the upcoming New Georgia invasion. |
| 21 Jun 1943 | In Operation Toenails, US 4th Marine Raider Battalion was dispatched to Segi, New Georgia to assist coast watchers in the area who were threatened by a Japanese advance. |
| 27 Jun 1943 | Companies Q and P of the US Marine Corps 4th Raider Battalion arrived at Segi, New Georgia to join the remainder of the battalion which had already landed six days prior. They were immediately deployed to attack the small naval base at Viru Harbor. |
| 30 Jun 1943 | US occupation troops arrived early at Nono, New Georgia, Solomon Islands and would join the US Marine Corps 4th Raider Battalion on the planned attack on Viru Harbor; nearby on the island of Vangunu, Companies N and Q of the US Marine Corps 4th Raider Battalion and 2nd Battalion of US Army 103rd Infantry Regiment landed unopposed near Oloana Bay; they would capture Wickham Anchorage by the end of the day. On Rendova Island, elements of the US Army 172nd Infantry Regiment, US Army 103nd Infantry Regiment, US Navy 24th Naval Construction Battalion, and US Navy 9th Defense Battalion landed against light resistance; Japanese aircraft attempted to disrupt landing operations, but they were intercepted by aircraft of US Marine Fighter Squadrons 121, 122, 213, and 221. |
| 30 Jun 1943 | While covering the landings on Rendova, Solomon Islands, destroyer USS Ralph Talbot engaged attacking Japanese Mitsubishi G3M 'Nell' bombers armed with torpedoes. Firing 5-inch shells fitted with VT proximity fuzes from her 5-inch/38 caliber guns, Ralph Talbot accounted for three bombers shot down on her own and one more shared with other ships. During the attack, one torpedo struck attack transport USS McCawley causing her to go dead in the water. Ralph Talbot came alongside and took aboard 300 McCawley officers and men. Three hours later, McCawley was sunk by torpedoes from US PT Boats. |
| 30 Jun 1943 | Cruisers USS Montpelier, USS Denver, USS Cleveland, and USS Columbia in column with destroyers USS Renshaw, USS Philip, USS Saufley, USS Waller, and USS Pringle bombarded Japanese shore installations in the Buin-Shortlands area of southern Bougainville, Solomon Islands. |
| 1 Jul 1943 | Two platoons from Company P, US Marine Corps 4th Raider Battalion overran the Japanese detachment at the village of Tombe on New Georgia near the Viru Harbor, while the remainder of Company P and Company Q occupied Tetemara on the west side of the harbor. On the same day, just to the south of New Georgia, the US Marine Corps 9th Defense Battalion arrived at Rendova with men, supplies, and 90mm and 150mm guns. Southeast of New Georgia, the US Marine Corps 4th Raider Battalion and Company F of the US Army 103rd Regiment fell back to Vura on the island of Vangunu in preparation of a counterattack to be launched against Kaeruka and Cheke Point in the next few days. |
| 2 Jul 1943 | Troops of US Army 43rd Division began to move from Rendova to New Georgia in the Solomon Islands, covered by gunfire from US Marines 9th Defense Battalion and US Army 192nd Field Artillery aimed at Munda Airfield; Japanese bombers attempted to interfere by attacking supply dumps on Rendova, causing heavy casualties. |
| 3 Jul 1943 | Japanese bombers attacked supply dumps on Rendova, Solomon Islands, but failed to cause significant damage. To the north, on New Georgia, troops of the 172nd Infantry Regiment of the US Army 43rd Division were landed on Zanana beach. |
| 4 Jul 1943 | US Marines and US Army troops secured Kaeruka and Cheke Point on Vangunu Island, just southeast of New Georgia in the Solomon Islands. On New Georgia, a 52-man special weapons unit of the US Marine Corps 9th Defense Battalion arrived with four 40mm anti-aircraft guns. To the south of New Georgia, the Japanese attempted attempted the last large daylight air raid on Rendova; 16 bombers were able to break through to drop bombs on the island, but 12 of them would be shot down. |
| 4 Jul 1943 | USS Helena escorted invasion transports to Kula Gulf west of New Georgia. |
| 4 Jul 1943 | Cruisers USS Honolulu, USS Helena, USS St. Louis with destroyers USS Nicholas, USS Strong, USS Chevalier, and USS O’Bannon departed Tulagi, Solomon Islands on patrol of the New Georgia Sound (The “Slot”) toward Kula Gulf. |
| 5 Jul 1943 | The US Northern Landing Group under Colonel Harry Liversedge landed at Rice Anchorage on the northern coast of New Georgia, Solomon Islands. On the same day shortly after midnight, US cruisers USS Honolulu, USS Helena, and USS St. Louis escorted by destroyers USS Nicholas, USS Strong, USS Chevalier, and USS O’Bannon entered Kula Gulf to shell Japanese positions on Kolombangara and New Georgia in support of the landings at Rice Anchorage. At the same time, Japanese destroyers Niizuki, Nagatsuki, Yunagi, and Satsuki arrived at the north end of Kula Gulf loaded with 1,300 reinforcement troops and 180 tons of provisions bound for Vila, Kolombangara at the south end of Kula Gulf. Upon the commencement of the American shelling at Bairoka Harbor, New Georgia, the Japanese commander, Commander Kunizo Kanaoka, aborted the mission and ordered a withdrawal. As they turned, Niizuki, Nagatsuki, and Yunagi launched a spread of 14 Type 93 “Long Lance” torpedoes into the gulf. At a range of 22,000 yards (11 nautical miles), one of the torpedoes struck and sank destroyer USS Strong. This is believed to be the longest successful torpedo attack of the war. The Americans never detected the presence of the Japanese destroyers and believed Strong was torpedoed by a submarine. |
| 6 Jul 1943 | During Battle of Kula Gulf in the Solomon Islands, US cruisers USS Honolulu, USS Helena, USS St. Louis with destroyers USS Nicholas, USS Radford, USS Jenkins, and USS O'Bannon engaged a Japanese force of destroyers Niizuki, Yunagi, Suzukaze, Tanikaze, Amagiri, Hatsuyuki, Nagatsuki, Satsuki, Mochizuki, Mikazuki and Hamakaze in the early morning darkness. Helena fired on the incoming Japanese convoy at 0157 hours, but the many gun flashes in turn made Helena an attractive target for Japanese gunners. Suzukaze and Tanikaze each launched Type 93 torpedoes. One struck Helena at 0203 hours, followed by two more at 0205 hours. Helena would sink at 0225 hours. Niizuki is sunk by gunfire. Nagatsuki was badly damaged and beached near Bambari Harbor, Kolombangara. |
| 7 Jul 1943 | The broken-off bow of USS Helena sank in Kula Gulf northwest of New Georgia. A US Navy PB4Y-1 Liberator aircraft dropped lifejackets and four rubber lifeboats to survivors in the area of the bow. |
| 7 Jul 1943 | The day after the Battle of Kula Gulf, a second cruiser force consisting of cruisers USS Montpelier, USS Denver, USS Cleveland, and USS Columbia and destroyers USS Renshaw, USS Philip, USS Saufley, USS Waller, and USS Pringle departed Tulagi on a night patrol up the New Georgia Sound (the "Slot"). |
| 8 Jul 1943 | Companies N and Q of USMC 4th Raider Battalion were dispatched on a patrol on Gatukai Island in New Georgia, Solomon Islands after reports on the possible presence of a 50-100 men Japanese garrison on the island. |
| 9 Jul 1943 | In the Solomon Islands, the US New Georgia Occupation Force advanced westward in the Munda-Barike region, toward the airfield at Munda. Nearby, 1st Raider Battalion attacked the island of Enogai. To reinforce New Georgia, the Japanese 13th Regiment began transferring 3,700 men from Kolombangara to Bairoko on the northwestern shore of New Georgia; this reinforcement would be conducted over the following 3 days. |
| 9 Jul 1943 | Sendai and Yugure arrived at Shortland Islands, Solomon Islands. Yugure, Yukikaze, Tanikaze, and Hamakaze departed later on the same day, escorting a troop transport mission to Kolombangara in the Solomon Islands. |
| 10 Jul 1943 | Companies N and Q of USMC 4th Raider Battalion completed their patrol of Gatukai Island in New Georgia, Solomon Islands and concluded that there were no Japanese on the island. Also on New Georgia, the US Marine Corps reported that the airfield at Segi was now ready for limited operations, while Companies O and P of the 4th Raider Battalion were slated to be relieved at Viru for transfer to Guadalcanal, Solomon Islands. Nearby, Marines of the 1st Raider Battalion captured the island of Enogai. |
| 10 Jul 1943 | Cruisers USS Montpelier, USS Denver, USS Cleveland, and USS Columbia and destroyers USS Renshaw, USS Philip, USS Saufley, USS Waller, and USS Pringle departed Tulagi on a night patrol up the New Georgia Sound (the "Slot"). |
| 11 Jul 1943 | Admiral William Halsey issued a directive for an attack in the Bougainville area in the Solomon Islands; Lieutenant General Alexander Vandegrift was to be the head of the invasion force. Elsewhere, the 1st Marine War Dog Platoon arrived in the theater in preparation of the Bougainville operations with the 2nd Marine Raider Regiment. At New Georgia, the US airfield at Segi Point was now fully operational. After sundown, US cruisers and destroyers bombarded Japanese positions at Munda, New Georgia. |
| 12 Jul 1943 | Companies N and Q of the USMC 4th Raider Battalion departed New Georgia in the Solomon Islands, returning to join the rest of the battalion at Guadalcanal. |
| 12 Jul 1943 | Cruisers USS Honolulu, USS St. Louis, and HMNZS Leander escorted by destroyers USS Nicholas, USS O’Bannon, USS Radford, USS Jenkins, and USS Chevalier joined with destroyers USS Gwin, USS Woodworth, USS Buchanan, and USS Maury. Together, these ships sailed up the New Georgia Sound (The “Slot”) toward Kolombangara. Yugure, Yukikaze, Hamakaze, and Kiyonami departed Shortland Islands, Solomon Islands, escorting a troop transport mission involving light cruiser Jintsu to Kolombangara, New Georgia Group, Solomon Islands. The two forces engaged in the Battle of Kolombangara that lasted into the next morning. |
| 12 Jul 1943 | In the early morning darkness, cruisers USS Montpelier, USS Denver, USS Cleveland, and USS Columbia and destroyers USS Renshaw, USS Philip, USS Saufley, USS Waller, and USS Pringle conducted a bombardment of Japanese installations in the Munda area on New Georgia in the Solomon Islands. |
| 13 Jul 1943 | Shortly after midnight, cruisers USS Honolulu, USS St. Louis, and HMNZS Leander escorted by destroyers USS Nicholas, USS O'Bannon, USS Radford, USS Jenkins, USS Chevalier, USS Gwin, USS Woodworth, USS Buchanan, and USS Maury engaged Japanese cruiser Jintsu and destroyers Yukikaze, Hamakaze, Yugure, Mikazuki, and Kiyonami in New Georgia Sound north of Kolombangara. Japanese Type 93 torpedoes damaged Honolulu, St. Louis, and Leander. Destroyers Woodworth and Buchanan were damaged in a collision. Jintsu was sunk by cruiser gunfire and a torpedo. Destroyer Yukikaze was damaged. Destroyer USS Ralph Talbot went to the aid of USS Gwin, badly damaged by a torpedo, and took aboard 155 officers and men. USS Maury took another 53 officers and men. Ralph Talbot then scuttled Gwin with torpedoes. The Japanese were able to land 1,200 men nevertheless. |
| 13 Jul 1943 | During the Battle of Kolombangara, cruiser USS St. Louis was struck by a Japanese torpedo in the port bow, causing moderate damage. Down by the head, St. Louis withdrew to Tulagi Harbor, Solomon Islands. |
| 13 Jul 1943 | During the Battle of Kolombangara, cruiser USS Honolulu was struck by a Japanese torpedo in the starboard bow, causing 60 feet of the bow to fold and collapse downward so the deck was nearly vertical. Another torpedo crashed through Honolulu’s stern but did not explode. Down by the head, Honolulu withdrew to Tulagi Harbor, Solomon Islands. |
| 14 Jul 1943 | US Marine tanks, units of US Army 9th Defense Battalion, and units of US Army 103rd Infantry Battalion arrived at Laiana Beach, New Georgia, Solomon Islands. |
| 15 Jul 1943 | The Japanese Navy launched 24 G4M bombers, escorted by about 40 to 50 A6M Zero fighters, to attack various targets in the central Solomon Islands; the bulk of the attack force was intercepted by US Army and US Navy fighters in the Rendova Island, New Georgia, Solomon Islands area, and 15 G5M bombers and 30 A6M fighters were shot down at a loss of only 3 American fighters. On land at New Georgia, men of the US Army and US Marine Corps launched an offensive at Laiana Beach. |
| 15 Jul 1943 | Destroyers USS Nicholas, USS O’Bannon, USS Radford, and USS Jenkins departed Tulagi, Solomon Islands to act as a covering force for the rescue of USS Helena survivors who had made their way to the island of Vella Lavella. |
| 16 Jul 1943 | More than 30 B-24 Liberator and B-17 Flying Fortress bombers of the US Thirteenth Air Force attacked Kahili Airfield on Bougainville, Solomon Islands. |
| 16 Jul 1943 | After midnight, destroyers USS Nicholas, USS O’Bannon, USS Radford, and USS Jenkins covered the force engaged in recovering 165 USS Helena survivors, 1 Japanese pilot taken as prisoner, 16 Chinese citizens, and 1 Australian coast watcher from the island of Vella Lavella. Upon retiring, Radford came across one of Nicholas's whaleboats left behind after Helena's sinking for the benefit of her survivors still in the water. In the boat were two Japanese sailors from the cruiser Jintsu sunk in the early morning of 13 Jul 1943. Radford took them prisoner. |
| 17 Jul 1943 | The US Army-Marine Corps joint offensive at Laiana Beach, New Georgia, Solomon Islands successfully penetrated the Japanese defensive line near Laiana Beach; Japanese troops of the 13th and the 229th Regiments attempted a counterattack; behind the front lines, 161st Infantry Regiment of the US Army 25th Division arrived as reinforcements. At Bougainville, 192 US aircraft struck the Japanese airfield at Buin. |
| 18 Jul 1943 | 21 USAAF Thirteenth Air Force B-24 bombers escorted by 20 fighters attacked Kahili Airfield, Bougainville, Solomon Islands. |
| 18 Jul 1943 | Kumano, Yugure, Kiyonami, and other ships departed Rabaul, New Britain, Bismarck Islands at 2150 hours as a part of the Night Battle Force to escort a transport run. 35 US Navy and US Marine Corps TBM Avenger dive bombers from Guadalcanal detected the Japanese force and attacked, damaging Kumano's aft hull plates, forcing the cruiser to withdraw toward Rabaul. |
| 19 Jul 1943 | US aircraft detected the Japanese Night Battle Force in the Solomon Islands at 1905 hours and attacked, and the attack was repulsed. At 2100 hours, Japanese destroyer transports were ordered to separately proceed to Vila, Kolombangara, Solomon Islands. At 2220 hours, flares were sighted over the transport destroyers, but no American warships arrived to attack. At 2310 hours, Japanese warships of the Night Battle Force (Kumano, Yugure, Kiyonami, Yukikaze, and others) reversed course for Rabaul, New Britain, Bismarck Islands. |
| 19 Jul 1943 | During the day, in the Solomon Islands, B-17 and B-25 aircraft attacked Ballale Airfield on Ballale, while B-25, SBD, and TBF aircraft attacked Japanese positions at Bairoko, New Georgia. After sundown, US PBY and TBF aircraft attacked a Japanese task force near Choiseul Island east of Bougainville, sinking a destroyer and damaging a cruiser, but also losing several aircraft. |
| 19 Jul 1943 | US B-17 aircraft bombed Kahili Airfield on Bougainville in the Solomon Islands. |
| 20 Jul 1943 | In the Solomon Islands, US 13th Air Force launched 18 B-24 bombers against Kahili Airfield, Bougainville Island and other targets on Ballale Island. |
| 20 Jul 1943 | On New Georgia in the Solomon Islands, the Northern Landing Group (1st Marine Raider Regiment, 4th Raider Battalion, and 3rd Battalion of the US Marine Corps and the 148th Division of the US Army) attacked Bairoko Harbor. |
| 20 Jul 1943 | At 0010 hours, a US TBF aircraft equipped with radar detected the Japanese Night Battle Force between Vella Lavella Island and Choiseul Island in the Solomon Islands. Multiple waves of aircraft were launched to attack. At 0034 hours, Yugure was hit by a 2,000-poung bomb amidships (sinking within minutes), followed by a hit on Kumano in the starboard quarter. Additional attacks scored no hits; two TBF and two B-25 aircraft were shot down during the attacks. Kiyonami picked up about 20 of Yugure's survivors at about 0200 hours. At 0521 hours, eight US B-25 bombers tasked with finding the damaged Kumano found Kiyonami instead, scoring a hit that detonated a magazine, and Kiyonami sank within two minutes. Only one of Kiyonami's crew survived (not found until 4 Aug 1943); all of Yugure's survivors were killed. At 1108 hours, the destroyer transports, having successfully delivered 300 men and supplies to Vila, Kolombangara, Solomon Islands before dawn, joined the surviving ships of the Night Battle Force, and they would arrive at Rabaul, New Britain, Bismarck Islands at 1730 hours. |
| 21 Jul 1943 | A large number of US Army and US Navy aircraft attacked Japanese positions at Bairoko, New Georgia in the Solomon Islands. Despite the powerful air strikes, the Northern Landing Group's attack on Bairoko Harbor was repulsed and the Americans fell back to Enogai; the Northern Landing Group was consisted of 1st Marine Raider Regiment, 4th Raider Battalion, and 3rd Battalion of the US Marine Corps and the 148th Division of the US Army. Nearby, a very small contingent of US Army, US Navy, and US Marine Corps officers landed at Barakoma, Vella Lavella to scout the area for a possible landing site. |
| 25 Jul 1943 | The Americans launched what would be the final offensive against Japanese positions on New Georgia in the Solomon Islands. |
| 31 Jul 1943 | After studying the findings of a small joint US Army, US Navy, and US Marine Corps reconnaissance mission to Vella Lavella between 21 and 22 Jul 1943, it was concluded that a landing in the Barakoma area was feasible. |
| 1 Aug 1943 | Americans captured the Munda airfield on New Georgia in the Solomon Islands. |
| 2 Aug 1943 | US Navy torpedo boat PT-109, commanded by Lieutenant (jg) John F. Kennedy, was rammed by a Japanese destroyer Amagiri in the Blackett Strait between Kolombangara and Arundel in the Solomon Islands. |
| 3 Aug 1943 | Tanks of the US Marine Corps 9th Battalion joined the American offensive on New Georgia in the Solomon Islands. |
| 6 Aug 1943 | In the Battle of Vella Gulf in the Solomon Islands, United States destroyers USS Dunlap, Craven, Maury, Lang, Sterett, and Stack, acting on intelligence gathered from Magic codebreaking intercepts, laid in wait for four Japanese destroyers on a night mission to bring troops to Munda on New Georgia. USS Dunlap, Craven, and Maury opened the attack by launching twenty-four Mark XV torpedoes in one minute. Japanese destroyers Hagikaze, Arashi, and Kawakaze were destroyed, killing 600 sailors and 900 Japanese Army passengers. Destroyer Shigure had a torpedo pass through her rudder but the ship was able to escape in the darkness. |
| 7 Aug 1943 | The Munda airfield on New Georgia in the Solomon Islands, captured by the Americans from the Japanese on 1 Aug 1943, was declared operational for emergencies. |
| 8 Aug 1943 | Battery B of the US Marine Corps 9th Defense Battalion was deployed at Kindu Point on New Georgia in the Solomon Islands to defend the southern coast of the island near Munda airfield. |
| 8 Aug 1943 | United States Navy Lt(jg) John Kennedy and the survivors of his crew of PT-109 were rescued from Olasana Island, Solomon Islands by PT-157 and PT-171. |
| 9 Aug 1943 | The main body of the Japanese Southeast Detached Force was moved to Kolombangara, New Georgia, Solomon Islands. Elsewhere on New Georgia, the two groups of the American New Georgia Occupation Force (Northern Landing Group and Southern Landing Group) made contact at a roadblock southwest of Triri. Also on New Georgia, a light anti-aircraft artillery battery of the US Marine Corps 11th Defense Battalion arrived at Enogai. |
| 10 Aug 1943 | Operational control of the US Northern Landing Group on New Georgia in the Solomon Islands was passed to the US Army 25th Division, while the US lst Marine Raider Regiment was detached from the Northern Landing Group to join other Marine Corps units at Enogai. |
| 11 Aug 1943 | Admiral William Halsey received operational orders for the New Georgia region of the Solomon Islands, including the seizure of Vella Lavella island and the elimination of Japanese positions on Kolombangara island. Meanwhile, US Army and US Marine Corps forces continued to engage Japanese troops on New Georgia. |
| 12 Aug 1943 | 24 B-24 bombers attacked Buin, Bougainville, Solomon Islands, destroying 13 A6M fighters, 10 D3A dive bombers, and 1 reconnaissance aircraft on the ground. |
| 13 Aug 1943 | US Army 43rd Division landed on Vela Cela (and discovered no Japanese positions) and Baanga just off western New Georgia in the Solomon Islands. Meanwhile, in Tokyo, the Imperial General Headquarters issued Directive No. 267 authorizing the abandonment of the central Solomon Islands region. |
| 14 Aug 1943 | US Marine Corps Brigadier General Francis Mulcahy moved the headquarters of Aircraft, New Georgia from Rendova island to the Munda Point airfield on New Georgia in the Solomon Islands. |
| 15 Aug 1943 | The US Northern Landing Force attacked Japanese positions on Vella Lavella island in the Barakoma airfield region near New Georgia, Solomon Islands. |
| 17 Aug 1943 | Destroyers USS Nicholas, USS Chevalier, USS O’Bannon, and USS Taylor departed Tulagi, Solomon Islands for a nighttime patrol to the northern reaches of the New Georgia Sound (The “Slot”) to interdict Japanese shipping. |
| 17 Aug 1943 | Destroyer USS Saufley covered the landing ships at Barakoma, Vella Lavella, Solomon Islands. |
| 18 Aug 1943 | Battle off Horaniu: Japanese destroyers Sazanami, Hamakaze, Isokaze and Shigure with subchasers Cha-5 and Cha-12 and 3 motor torpedo boats were escorting 13 Diahatsu barges bound for Horaniu on Vella Lavella Islands, Solomon Islands to establish a barge depot to assist with evacuating bypassed Japanese troops on Kolombangara. An American destroyer force of USS Nicholas, USS Chevalier, USS O’Bannon, and USS Taylor intercepted the Japanese convoy. The barges found refuge in the many coves along Vella Lavella’s north shore but two Japanese subchasers, two motor torpedo boats, and at least one barge were sunk. The Japanese were able to establish a barge depot at Horaniu and barges operating from this depot would eventually evacuate 9,000 Japanese troops from Kolombangara. |
| 19 Aug 1943 | Destroyers USS Nicholas, USS Chevalier, USS O’Bannon, and USS Taylor departed Tulagi, Solomon Islands for a nighttime patrol to the northern reaches of the New Georgia Sound (The “Slot”) to interdict Japanese shipping. |
| 20 Aug 1943 | Baanga island, located just off western New Georgia in the Solomon Islands, was secured by elements of the US Army 43rd Division. |
| 20 Aug 1943 | Shortly after midnight, while searching the northern coast of Vella Lavella Island for more Japanese landing barges from the convoy encountered the previous night, destroyers USS Nicholas, USS Chevalier, USS O’Bannon, and USS Taylor located and attacked two barges near the shore. One was sunk and the other was damaged. The destroyers then retired at high speed toward Tulagi while they were attacked almost continuously by Japanese aircraft, inflicting no damage. |
| 23 Aug 1943 | Shortly after midnight, destroyers USS Nicholas, USS Chevalier, USS O’Bannon, USS Taylor, USS Saufley, USS Cony, and USS Renshaw made a patrol through Vella Gulf, Solomon Islands without locating any shipping. Persistent air attacks from Japanese aircraft resulted in no damage. |
| 24 Aug 1943 | US Marine Corps Colonel William Brice moved the headquarters of his Fighter Command to the Munda Point airfield on New Georgia in the Solomon Islands. On this date, the responsibility of Commander, Aircraft, New Georgia was also merged under his command. |
| 25 Aug 1943 | Americans captured Bairoko Harbor on New Georgia in the Solomon Islands. |
| 25 Aug 1943 | Shortly after midnight, destroyers USS Nicholas, USS Chevalier, USS O’Bannon, and USS Taylor acted as a covering force for minelayers mining Vella Gulf southwest of Kolombangara, Solomon Islands. [off Wilson Cove; same waters as PT-109 sinking 2 Aug 1943] |
| 26 Aug 1943 | Shortly after midnight, destroyers USS Nicholas, USS Chevalier, USS O’Bannon, USS Taylor, and USS Pringle made a nighttime patrol through Vella Gulf, Solomon Islands but encountered no shipping. |
| 27 Aug 1943 | The US Army 172nd Infantry Regiment crossed Hathorn Sound from New Geogia to Arundel Island in the Solomon Islands and captured Japanese artillery positions which had been shelling American positions at Munda Point, New Georgia. |
| 28 Aug 1943 | Two US Corsair fighter squadrons attacked Kahili Airfield in Buin, Bougainville in the Solomon Islands. Lieutenant Al Jensen of US Marine Corps squadron VMF-214, flying a Corsair fighter, was credited with destroying 24 Japanese planes on the ground during this mission. |
| 15 Sep 1943 | B-24 bombers, escorted by Corsair fighters of US Marine Corps squadron VMF-214, flew a photographic reconnaissance mission over Choiseul, Solomon Islands. |
| 16 Sep 1943 | Gregory Boyington led 24 Corsair fighters of US Marine Corps squadron VMF-214 from Banika, Russell Islands to join 80 other aircraft of other squadrons to attack Ballale fighter base southeast of Bougainville island. 40 A6M fighters rose to defend the base. The Americans were credited with 17 Japanese aircraft shot down and 9 probables (VMF-214 alone was awarded 11 (5 of which were Boyington's) and 8, respectively), but lost pilot Bob Ewing in the action. Post-war Japanese records would reveal that only 6 aircraft were shot down in battle that day, with a further 1 aircraft written off due to heavy damage. |
| 3 Oct 1943 | USS Nicholas arrived at Tulagi, Solomon Islands. While at Tulagi, Commander Alvin Chandler assumed command of Destroyer Squadron 21 (DesRon21), hoisting his pennant in Nicholas. Cdr Chandler had recently completed service as commander of DesRon41 during the Battle of Rennell Island. Destroyers Nicholas, USS O’Bannon, and USS Chevalier then departed Tulagi on a patrol up the New Georgia Sound (The “Slot”) to Vella Gulf. North of Kolombangara, the group fired on two Japanese troop barges that burned and sank. |
| 4 Oct 1943 | Shortly after midnight, destroyers Nicholas, USS O’Bannon, and USS Chevalier fired on a small Japanese gunboat in the New Georgia Sound (The “Slot”) between Kolombangara and Choiseul Islands, Solomon Islands. The gunboat broke in two and sank. The destroyers then returned to Tulagi. |
| 6 Oct 1943 | During the Battle of Vella Lavella, destroyer USS Chevalier was sunk by Type 93 torpedoes launched from Japanese destroyer Yugumo. |
| 7 Oct 1943 | The Fletcher-class destroyer USS Chevalier was sunk by a torpedo fired from the USS La Vallette following severe damage inflicted during an engagement with Japanese destroyers fought on the previous day off Vella Lavella, Solomon Islands. |
| 8 Oct 1943 | Destroyers USS Nicholas, USS Saufley, and USS Fletcher covered a convoy of LSTs unloading at Barakoma, Vella Lavella, Solomon Islands. |
| 14 Oct 1943 | USS Nicholas covered a convoy of LSTs unloading at Barakoma, Vella Lavella, Solomon Islands. |
| 27 Oct 1943 | New Zealand 8th Brigade captured Mono Island and Stirling Island of Treasury Islands of the Solomon Islands. |
| 28 Oct 1943 | US 2nd Marine Parachute Battalion landed by sea at Voza on Choiseul Island in Operation Blissful. |
| 29 Oct 1943 | US Task Force 38 sortied from Espiritu Santo, New Hebrides in support of the Bouganville, Solomon Islands invasion. |
| 1 Nov 1943 | Men of the US 3rd Marine Division landed at Torokina Point on the northern coast of Empress Augusta Bay, Bougainville, Solomon Islands; the beach was defended only by a small 300-strong garrison, but the effective Japanese defense surprised the attackers. In response of the invasion, Japanese aircraft from Rabaul, New Britain, attacked the US fleet, damaging destroyer USS Wadsworth (killing 2), but at the heavy cost of 16 A6M fighters lost. The Japanese dispatched a counter-invasion force consisted of Cruiser Division 4 (Vice Admiral Takeo Kurita) and transports carrying thousands of troops; the fleet was en route to Rabaul when it was detected by a B-24 Liberator bomber (Lieutenant Robert Sylvernale) while heading toward the western approach of Saint George's Channel between New Britain and New Ireland. |
| 2 Nov 1943 | Four Japanese cruisers and six destroyers sortied out of Rabaul, New Britain to attack the US Marine invasion of Bougainville in the Solomon Islands. 75 B-25 bombers escorted by 80 P-38 fighters attacked this fleet just out of Rabaul, damaging cruiser Hajuro, damaging cruiser Myoko, sinking one submarine chaser, destroying 18 aircraft, damaging destroyer Shirasuyu, and damaging a number of smaller vessels; the Americans lost 8 B-25 and 9 P-38 aircraft in combat, plus more to be written off due to battle damage. The Japanese fleet, sailing at a reduced speed, engaged American warships at 0230 hours in Empress Augusta Bay. The Americans struck first, scattering the Japanese formation, but the Japanese were able to regroup and forced the American ships to withdraw. Though the action was inconclusive, the Japanese failed to disrupt American operations on Bougainville. |
| 5 Nov 1943 | After aircraft of US Task Force 38 attacked Rabaul in New Britain, the Japanese launched a counterattack against the carrier fleet. The 18 B5N2 aircraft failed to find the main fleet off Bougainville in the Solomon Islands, and instead attacked a convoy of three vessels (one LCI, one LCT, and one PT boat) nearby. They made two torpedo hits, both of which were duds, killing one. One B5N2 aircraft was shot down. Japanese propaganda claimed that this attack resulted in the sinking of 1 US carrier, 2 cruisers, and 2 destroyers. |
| 6 Nov 1943 | While escorting LSTs to the landing beaches at Torokina, Bougainville, destroyer USS Saufley observed a life raft floating in Empress Augusta Bay. Upon investigating, Saufley took aboard 10 US Marines returning from a patrol along the beach. All were in good health. |
| 12 Nov 1943 | At 0400 hours, 9 G4M and 5 B5N aircraft attacked a convoy of LST and converted destroyer-transport vessels in the Solomon Islands, sinking destroyer-transport USS McKean but also losing 4 B5N aircraft in combat. 1 G4M and 1 B5N aircraft suffered heavy damage but were able to return to Rabaul, New Britain. In the late morning, 10 D3A and 55 A6M aircraft, also from Rabaul, attacked an American convoy in the Solomon Islands. 10 Japanese aircraft were shot down; minimal damage was inflicted to the American vessels. |
| 25 Nov 1943 | The Battle of Cape St. George took place near Buka Island north of Bougainville in the Solomon Islands; three Japanese destroyers were sunk at the end of what was to be the final surface battle of the Solomon Islands campaign. |
| 30 Nov 1943 | Shortly after midnight, US destroyers USS Ralph Talbot & Helm along with Australian destroyers HMAS Arunta & Warramunga shelled the Ring Ring Plantation area of Gasmata, New Britain with the aid of flares dropped by PBY Catalina "Black Cat" aircraft.. |
| 10 Dec 1943 | Torokina Airfield at Bougainville, Solomon Islands was declared fully operational after a short 40-day construction. 17 F4U aircraft of US Marine Corps squadron VMF-216 became the first to officially arrive at the airfield, although the airfield had already received two unscheduled emergency landings on 24 Nov 1943 and 8 Dec 1943. |
| 27 Dec 1943 | Cruisers USS Honolulu and USS St. Louis bombard Kieta and Numa Numa Plantation on the north shore of Bougainville. |
| 8 Jan 1944 | USS Honolulu and USS St. Louis departed Tulagi, Solomon Islands and that evening conducted a bombardment strike against the Shortland Islands south of Bougainville. |
| 9 Jan 1944 | USS Honolulu and USS St. Louis shifted to the west of Torokina to cover landing of reinforcements there. |
| 8 Mar 1944 | Japanese troops began a 5-day offensive against US positions at Bougainville, starting Battle of Hill 700. |
| 24 Mar 1944 | Japanese troops mounted an unsuccessful suicide charge on Bougainville. |
| 25 Oct 1944 | At Truk in the Caroline Islands, Isoroku Yamamoto sent a message to Vice Admiral Chuichi Nagumo in the Solomon Islands, noting that intelligence indicated that American carriers would be somewhere northeast of the Solomon Islands on the following day. |
Please consider supporting us on Patreon. Even $1 per month will go a long way! Thank you. Please help us spread the word: Stay updated with WW2DB: |
Visitor Submitted Comments
2 Aug 2006 06:14:06 PM
MY FATHER WAS IN WW2 I HAVE BEEN TRYING TO FIND A PICTURE OF PONTOTOC VICTORY SHIP, THEONE HE CAME BACK ON CAN YOU HELP ME
19 Nov 2007 12:42:20 PM
I am looking for a photo for a friend (marine)who was in the war. He said he was bare chested wearing beads and holding up a blanket. Attack on bougainville 1943.
Please help.
1 Jan 2008 07:05:30 PM
I am looking for a photo or information regarding my father, John William Stein, who was in the Marines who fought at Bougainville in WWII. Is he partially pictured in the back of the photo captioned U.S. Marine Raiders gather in front of a Japanese dugout on Cape Totkina, Bougainville? He later died in a car accident at Quantico, Va. when I was two years so I never knew much about him. Anyone know or know of him? Please help. Thank you.
16 Jan 2008 07:28:54 PM
My uncle Harold A. Mulligan was on the
USS PRESTON (DD-379) when it was sunk
11-14-1942. The USS Preston took 116 men
down with her. Is there a way to find
the names of the ship crew.
Thank you,
Robert McBride
9 Feb 2008 08:54:48 PM
Am looking for information on Corporal Lin Cunningham who was a coastwatcher in Vella Lavella 1943-44.Any details appreciated. Many thanks, Ellen Hyland
17 May 2009 08:38:43 AM
On 12th November 1942, a look out post was established on Rennell Island, Solomon Islands and commanded by 1st Lt. Emmett N. Carter plus 10 marines. They were a detachment from th 2nd Marines based on Espirtu Santos.
I wish to know the full names of the 10 marines who stationed on Rennell untill 3rd January 1943 when they left.
See the book Hells Islands by Stanley Coleman
17 Oct 2009 02:45:43 PM
i need a list of marines that fought with ira hayes. i work in a retirement home and wondered if any of my residents were there let me know
8 Nov 2009 09:16:44 PM
My father David D. Roberge, was a Petty officer on the Black Gang, of the Fletcher Calss Destroyer Chevalier DD-451 Sunk off of Vella LaVella, in the battle of Vella LaVella, on 6 Oct,1943 Cruising with the Nickolas, the O'Bannon, and the Selfridge
11 Nov 2009 08:14:09 AM
My Grandpa was on the Lucky Lou during WW2. His name was RMC Robert Phellps. His nickname was "Pappy", this was due to his age. Please write if you knew or heard any stories about him. Thankyou.
1 Mar 2010 01:51:18 PM
What happened to the solomon islands after world war 2?
What happened to all the islands after world war 2?
31 Mar 2010 07:23:57 AM
Hi all, whilst on a mission in solomans about 4 months ago I was walkin through a small village where I stayed and was givin a coin from a local who found it after the war. The coin was issued to Luther T Barndt, it was issued from firestone on the front it has a big V with a eagle and inscribed it says " good luck, happy return". I would love to be able to return the coin to it's owner/family. Any help would be great, email me on zane_and_stitch@hotmail.com
from Australia
Zane cross
11 Apr 2010 08:19:36 PM
what use to sink the japanese barges???
30 Dec 2010 11:58:40 AM
I would like to contact any family members of Marines from the 9th Defense Battalion, 1st Marine Division. Parris Island 1941 to Iwo Jima 1945. Please send me an email.
ssgtvdog@afbradio.us
6 Feb 2011 05:23:10 PM
Hi,
I'm looking for anyone in who in SQ.24 air base Group 2.. Wing Serve SQ3, fighting SQ472 or Fighting SQ461...My Father was an aircraft Engineer for these groups..His name was William McKenzie.. He was a US Marine!!! Any info on these Sq. or my dad would be greatly appreciated..
Thank you
8 Feb 2011 10:26:31 AM
Update on my DAD...Anyone have any info on the 604th Platoon San Diego,Ca. 1942??? My dad was part of that Platoon..Just found a picture in some old photo.. It has the whole Platoon in the Picture..
Again any info would be greatly appreciated...
Thank Jeff
26 May 2011 05:34:39 PM
Looking for information on Robert C. Heroux who died somewhere in the Paciic during WW II. He was a Marine gunner - do not know squadron he flew with
1 Jul 2011 04:27:21 AM
On 12th November 1942, a look out post was established on Rennell Island, Solomon Islands and commanded by 1st Lt. Emmett N. Carter plus 10 marines. They were a detachment from th 2nd Marines based on Espirtu Santos.
One of them had the name poea (by the locals)
I wish to know the full name of this marine who were stationed on Rennell untill 3rd January 1943 when they left.
See the book Hells Islands by Stanley Coleman
11 Oct 2011 10:09:25 PM
Anyone can help me out, am searching for a relative, or family member of a victim of the 2nd worldwar,I have something to tell them, he's been in the Solomon Islands during the 2nd world war 1942 , US Army and he's from California
12 Oct 2011 06:54:23 PM
Am searching for family members,relative of one of the US army who have died in the second world War in 1942 in The Solomon ISlands,His name is Richard Peterson,Califonia, can contact me on jangie91@gmail.com
28 Oct 2011 10:25:24 AM
Looking for wwII information regarding activity at CUB 2 MTB Base 3 Russell Is.
17 Feb 2012 10:53:16 AM
add info about the midnight raid on guadalcanal.
20 Feb 2012 12:56:49 PM
Anyone with info on the 604th Platoon out of San Deigo??? My dad was in that platoon.. He was with the Repair and salvage Sqaudron 1..Please anything on the 604th would be greatly appreicated..
You can sendme an Email at Wshbrigr1@yahoo.com
Thank you
20 Jun 2012 04:25:11 PM
Hello everyone my grandfather was in the 65th combat engineer battalion ad I heard that they fought in New Georgia before going to Luzon in the Philippines, and from there to occupy Japan. ANYTHING would be great.
30 Dec 2012 05:06:46 AM
In my Dad's memoirs he mentions CUB-2. Is that Construction Unit Batallion-2? Where would that have been located?
regards,
23 Jul 2013 07:12:03 PM
I am looking for anyone still living who survived the bombing of the USS Carrier Wasp on Mar 19, 1945. My uncle died in the bombing and I was wondering if anyone is still living who remembers that incident!
12 Aug 2013 06:54:38 PM
to anonymous in thread 24-My Dad was also in the 65th Engineers during the war-I have many pictures-email me kmb080 at comcast dot net
6 Mar 2014 04:59:06 AM
Oh My this is a very good site, it is exciting to
learn new information, and new information that
I have not gone over with a back hoe. Love it.
8 Mar 2014 05:07:11 PM
My Dad was a Motor Machinest Mate III on a "Crash Boat" in Solomon Islands in WWII. His name was Gerald "Jerry" Joseph O'Toole from Grand Rapids, MI. If anyone knew him, please send me an email. Thank You!
3 Aug 2015 09:59:46 PM
My father was in the navy and landed on Guadalcanal with his hometown friend F E Bush. They came under attack by a Japanese plane and attempted to get safety under a water tower. There was several other men also under it and no room for them. The water tower was hit and most if not all of the men under it were killed. They fled into the jungle during the raid. The water tower was hit and most if not all of the men under it were killed.A retreat was ordered but they did not hear it and was stranded on the island for 2 to 3 months. They were later rescued by the Marines. This was around 1942 to 1943.
Is there anyone whose family member was in the Marines at this time and told of this rescue?
I would appreciate any information about this.
Thank you!
21 Sep 2015 07:20:11 PM
On what Solomon Island was Hill 131 located? Just returned from the islands on a tour and it was one that we climbed.
13 Apr 2016 06:02:37 PM
John W. Geddings won the Silver Star and the name
PIneapple Kid for his Bravery later lost his life on IWO
JIMA
24 Oct 2016 12:05:16 PM
My Dad, Norman Beyer, was a forward observer in Guadalcanal. He was emotionally tortured by the war and would not share much with us. Although, I recall waking up to tortuous screaming as he relived what happened to him. To the day he died, he would not eat coconut, rice and pineapple. The reason was because the Navy could not get supplies in to them. He mentioned events of Japanese snipers in trees waiting for them. He personally hauled out his buddies with their heads half blown off. He mentioned flying with the Air Force over an airfield dropping beer bottles on the runway so Japanese airplanes could not land safely. As sad as it sounds, I really wish I knew the account of his full time in the military and the so called "War to end all "Wars.
13 Mar 2017 09:25:21 AM
Is there possibility to learn the account of Flight 300 (11 SBDs) diverted to land Henderson Field CAF instead landing back to CV-6 USS Enterprise after action at the Battle of Eastern Solomons. I´m collecting data of Air Groups actions and circumstances. Thanks
12 May 2017 08:05:35 PM
My father fought on Bougainville as far as I know with a black unit but he refused to talk about it except once he described how flamethrowers fought off Japanese banzai attacks.
24 Jun 2019 05:40:22 PM
My father Sebon Brown served in 4076th Quartermaster. He was a squad leader and was at the Northern Solomon's and Luzon. I have his medals and discharge papers. My Dad passed away at 98 April 19,2019
22 Jul 2019 09:17:21 PM
It is interesting how culture played such an important part in both Japanese and American war fighting strategies. The Japanese lionised the ninja culture, where a stealthy lightly armoured and agile warrior defeated a heavily armoured and armed enemy. The American culture has always lionised the rules based slugfest. The Japanese culture is expressed in the Zero fighter, and nighttime torpedo tactics. The American aircraft and ships were designed for a daytime boxing slugfest, where blows were both delivered and received. The Japanese exploited this, thus, American cruisers fighting all in a line, delivering multiple broadsides was the perfect target for a night-time torpedo strike from Japanese destroyers, that had no intention of partaking in a such a slugfest.
3 Sep 2019 10:12:38 AM
My father was in the northern Solomon Islands, New Guinea, Bismarck Archipelago and Leyte. He absolutely wouldn't talk about it. He wouldn't even tell us what Battalion he was in. All I do know is that he was AA with army designation. Would love to find his unit. All of his records supposedly burned in a warehouse fire in Missouri.
4 Mar 2020 08:08:01 PM
Terry my Father was on the same Islands, He was in ordinance,, A sergeant, 14th Airdrome,
7 Feb 2022 08:03:39 AM
This book is a diary of the experience of missionnaries held captive by the Japanese near Rabaul, and being bombed in their prison camp.
13 Jun 2022 06:38:17 AM
My Uncle was a seaman aboard the
USS G.F.Elliott .After his ship was sunk, he was attached to the A.F.B.P. the amphibious force boat pool and the
B.R.U, the boat repair unit. both at Lunga point. Are these units part of the naval operating base Cactus?
All visitor submitted comments are opinions of those making the submissions and do not reflect views of WW2DB.
» Abe, Hiroaki
» Ainsworth, Walden
» Arima, Masafumi
» Browning, Miles
» Burke, Arleigh
» Fitch, Aubrey
» Fletcher, Frank
» Geiger, Roy
» Halsey, William
» Hara, Chuichi
» Hara, Tameichi
» Hayes, Ira
» Imamura, Hitoshi
» Inoue, Isamu
» Isawa, Yutaka
» Jenkins, Samuel
» Kagawa, Kiyoto
» Kashimura, Kanichi
» Kennedy, John
» Kenney, George
» Kinkaid, Thomas
» Kodaira, Yoshinao
» Kondo, Masaichi
» Kondo, Nobutake
» Kurita, Takeo
» Kusaka, Jinichi
» Lee, Willis
» Mitscher, Marc
» Nagumo, Chuichi
» Omori, Sentaro
» Ota, Minoru
» Sasaki, Noboru
» Shiraichi, Kayutaka
» Soji, Akira
» Tanabe, Yahachi
» Tanaka, Raizo
» Tokuno, Hiroshi
» True, Arnold
» Turner, Richmond
» Vandegrift, Alexander
» Vorse, Albert
Locations:
» Australian New Guinea
» British Western Pacific Territories
Ship Participants:
» Agano
» Amagiri
» Arashio
» Asagumo
» Atago
» Bunker Hill
» Chicago
» Chikuma
» Chitose
» Columbia
» Denver
» Drayton
» Ellet
» Enterprise
» Grampus
» Grayson
» Haguro
» Helena (St. Louis-class)
» Hiei
» Honolulu
» Hornet (Yorktown-class)
» Independence
» Isuzu
» Jintsu
» Juneau
» Junyo
» Kirishima
» Kumano
» Mahan
» Maya
» Mogami
» Montpelier
» Mutsu
» Mutsuki
» Myoko
» Nagara
» Nashville
» New Orleans
» Nicholas
» North Carolina
» Onami
» Oshio
» Pensacola
» Phoenix
» Porter
» Portland
» Preston (Mahan-class)
» Princeton
» Pringle
» Ralph Talbot
» Ryujo
» San Diego
» San Juan
» Saratoga
» Saufley
» Sendai
» Shaw
» Shigure
» Shokaku
» South Dakota
» St. Louis
» Suzukaze
» Suzuya
» Takao
» Tanikaze
» Tenryu
» Tone
» Victorious
» Washington
» Yugure
» Yukikaze
» Yuzuki
» Zuiho
» Zuikaku
Notable Aircraft:
» B5N
Documents:
» Interrogation Nav 13, Captain Yasuji Watanabe
» Interrogation Nav 16, Commander Masatake Okumiya
» Interrogation Nav 46, Lieutenant Commander S. Yunoki
» Interrogation Nav 52, Commander Yasumi Doi
» Interrogation Nav 60, Captain Yasumi Toyama
» Interrogation Nav 8, Commander Masatake Okumiya and Commander H. Sekino
» Interrogation Nav 82, Captain Tsuneo Shiki
» Interview with Bert Earnest
Related Books:
» Hell in the Pacific: A Marine Rifleman's Journey From Guadalcanal to Peleliu
» Helmet for My Pillow
» Helmet for My Pillow
» Lucky's Life
» Santa Cruz 1942: Carrier duel in the South Pacific
» Target: Rabaul
Partner Sites Content:
» Battle of the Bismarck Sea
- » 1,171 biographies
- » 337 events
- » 44,911 timeline entries
- » 1,244 ships
- » 350 aircraft models
- » 207 vehicle models
- » 376 weapon models
- » 123 historical documents
- » 261 facilities
- » 470 book reviews
- » 28,521 photos
- » 365 maps
Fleet Admiral Chester W. Nimitz, 16 Mar 1945
Please consider supporting us on Patreon. Even $1 a month will go a long way. Thank you!
Or, please support us by purchasing some WW2DB merchandise at TeeSpring, Thank you!
25 Apr 2006 02:11:55 PM
Good article but I miss a map (or link) and a few details about the locations:
-which of the battles are actually related to Guadancanal?
-Some more background info to put this campaign into perspective, please!
-No reference to Tokyo Express nor Savo island!
-Distances ro Espiritu Santo and Rabaul (main bases?)
-Very few Japanese viewpoints
-Summary of vessels lostdamaged
Othervise VERY good!